Nutanix Expansion Explorer 1.0

Nutanix Expansion Explorer 1.0

Background

In the early days, Nutanix was dealing with both hardware and software sales. Nutanix sold hardware nodes along with the Life Of Device (LOD) software license before transitioning into software and subscription billing. Nutanix started the transition to the software journey back in 2017. Before the journey began, Nutanix had already sold more than 100K nodes. All these nodes we sold along with the LOD software license. The majority of the hardware sold pre-2018 were NX-G5/G6 boxes, roughly 120K+, and most of the NX-G5 & G6 nodes are already past the End of Maintenance (EOM) dates. These nodes will be reaching the End of Support Life in the next few months and all support for the product will cease unless entitled to an active extended support contract, which can be quite expensive. 

This means there is a great opportunity to refresh a vast number of nodes with aging hardware without support. At the same time, the customers have to migrate from LOD to subscription-based licensing, Capacity Based License (CBL). While this is a great opportunity to refresh the hardware and migrate the software license, it is a herculean task for the sales teams to identify these opportunities at the right time. Expansion Explorer 1.0 aims to solve this problem and guide our Nutanix Sales team & Partners to go after these opportunities. 

Product Benefits 

There is more than one persona for Expansion Explorer, the initial launch is limited to Nutanix users & select Partners. Within Nutanix, we have multiple personas – Account Owner, Customer Success Representative, and Systems Engineer. The Systems SEs within Nutanix can be an SE working on the solution or a channel SE guiding the Partner SE. 

For the Account Owner, Expansion Explorer gives access to high-quality sales leads and the associated potential ACV for existing accounts so that the Account Owners can quickly retire their quota.

For the Systems Engineer, Expansion Explorer automatically gathers precise workload requirements for Pulse-enabled clusters and provides a prebuilt Sizer-recommended solution as starting point to simplify the sizing exercise. 

Nutanix Expansion Explorer Workflow 

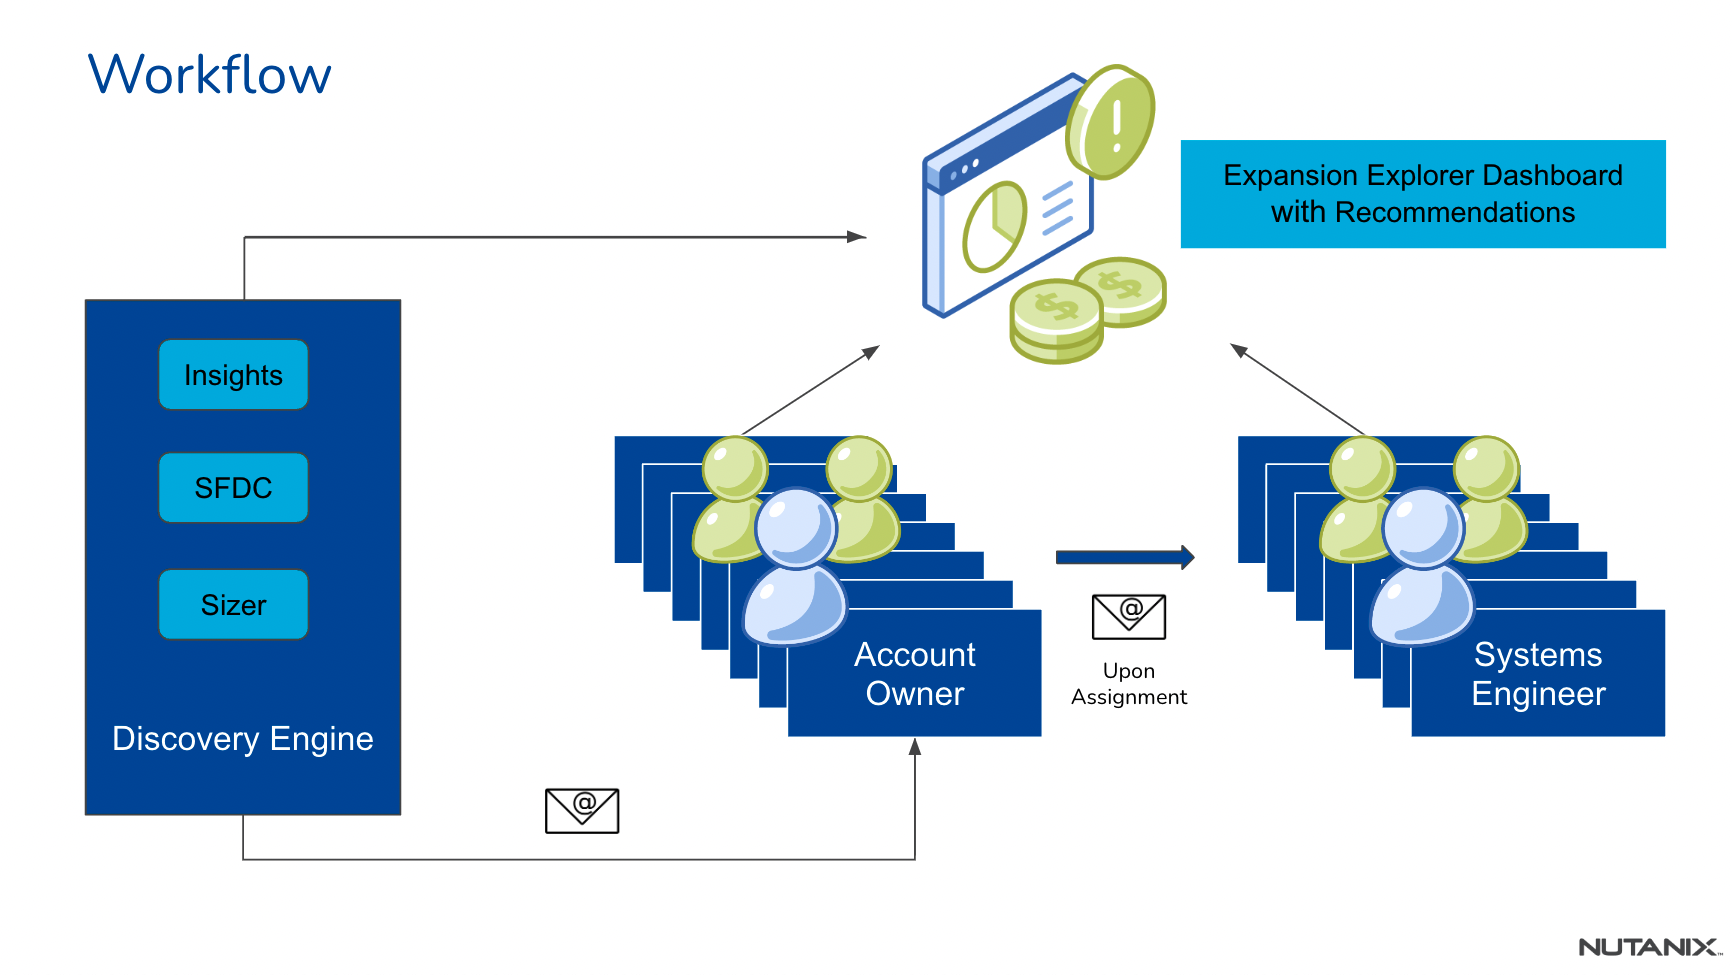
Expansion Explorer Discovery Engine periodically scans for all the clusters that are calling back home via Pulse. In version 1.0, Expansion Explorer identifies all clusters containing NX nodes that are EOM and need tech refresh. These clusters are then mapped to the respective account owners, CSR, and SE by looking up the data in SFDC. For each cluster that needs a hardware refresh, we gather the workloads being run on them and feed the workload information to Sizer. Sizer comes up with a recommended hardware solution to run these workloads on the latest NX hardware along with the subscription-based Portfolio 2.0 licenses. 

Expansion Explorer identifies leads on behalf of the Account Owner and comes up with a Sizer-recommended solution for the Systems Engineer. All the leads that belong to the given Account Owner are then pushed to the respective Account Owner, CSR, and SE’s Dashboard. The Account Owner would also be notified via email digest about all the leads at the end of the periodic scan. 
Account Owner Dashboard

The Account Owner is the gatekeeper of the leads generated by the Expansion Explorer. The Account Owner can look at the following details of each lead:

Column Name Description
Lead ID Unique lead ID for the cluster that needs to undergo a full hardware refresh
Account Name Name of the Account that owns this cluster, the hyperlink redirects the user to the SDFC Account post-authentication. 
Cluster Name Name of the cluster for which the lead is generated, the hyperlink redirects the user to the cluster within Nutanix Insights post-authentication. 
Cluster Details Provides the node quantities and the hardware model that is part of this cluster.
Recommended Sizing A link to autogenerated Sizer solution based on the cluster workload information gathered via Nutanix Insights. The hyperlink redirects the user to the scenario in Sizer post-authentication.
Create Date The date on which this lead was generated by Expansion Explorer.
Potential Deal Size The total list price of the recommended solution including both the hardware and software is recommended by Sizer.

The Account Owner’s dashboard contains two tabs – Open and Accepted.

Open Leads

Any new lead generated by the Expansion Explorer lands in the “Open” tab. 
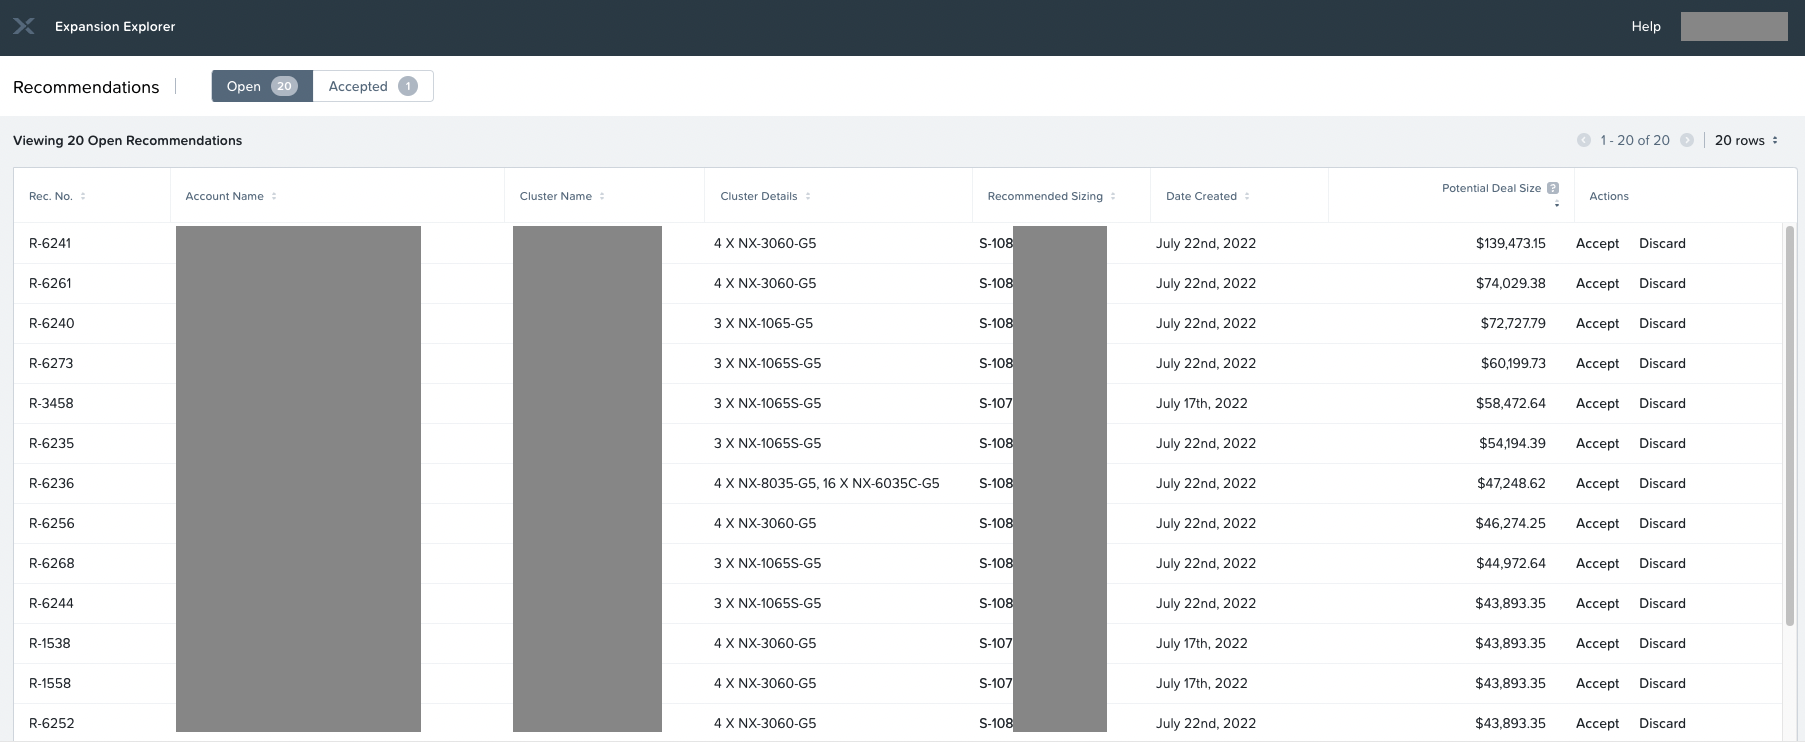
The Account Owner can either “Accept” or “Discard” the lead. 

Accepting Leads & pursuing them Directly

The Account Owner can accept a lead by clicking “Accept”. The below dialog is presented to the Account Owner on clicking “Accept”. The Account Owner can then go ahead and assign the recommendation to either Nutanix Systems Engineer and hand it over to a Partner to take it forward.
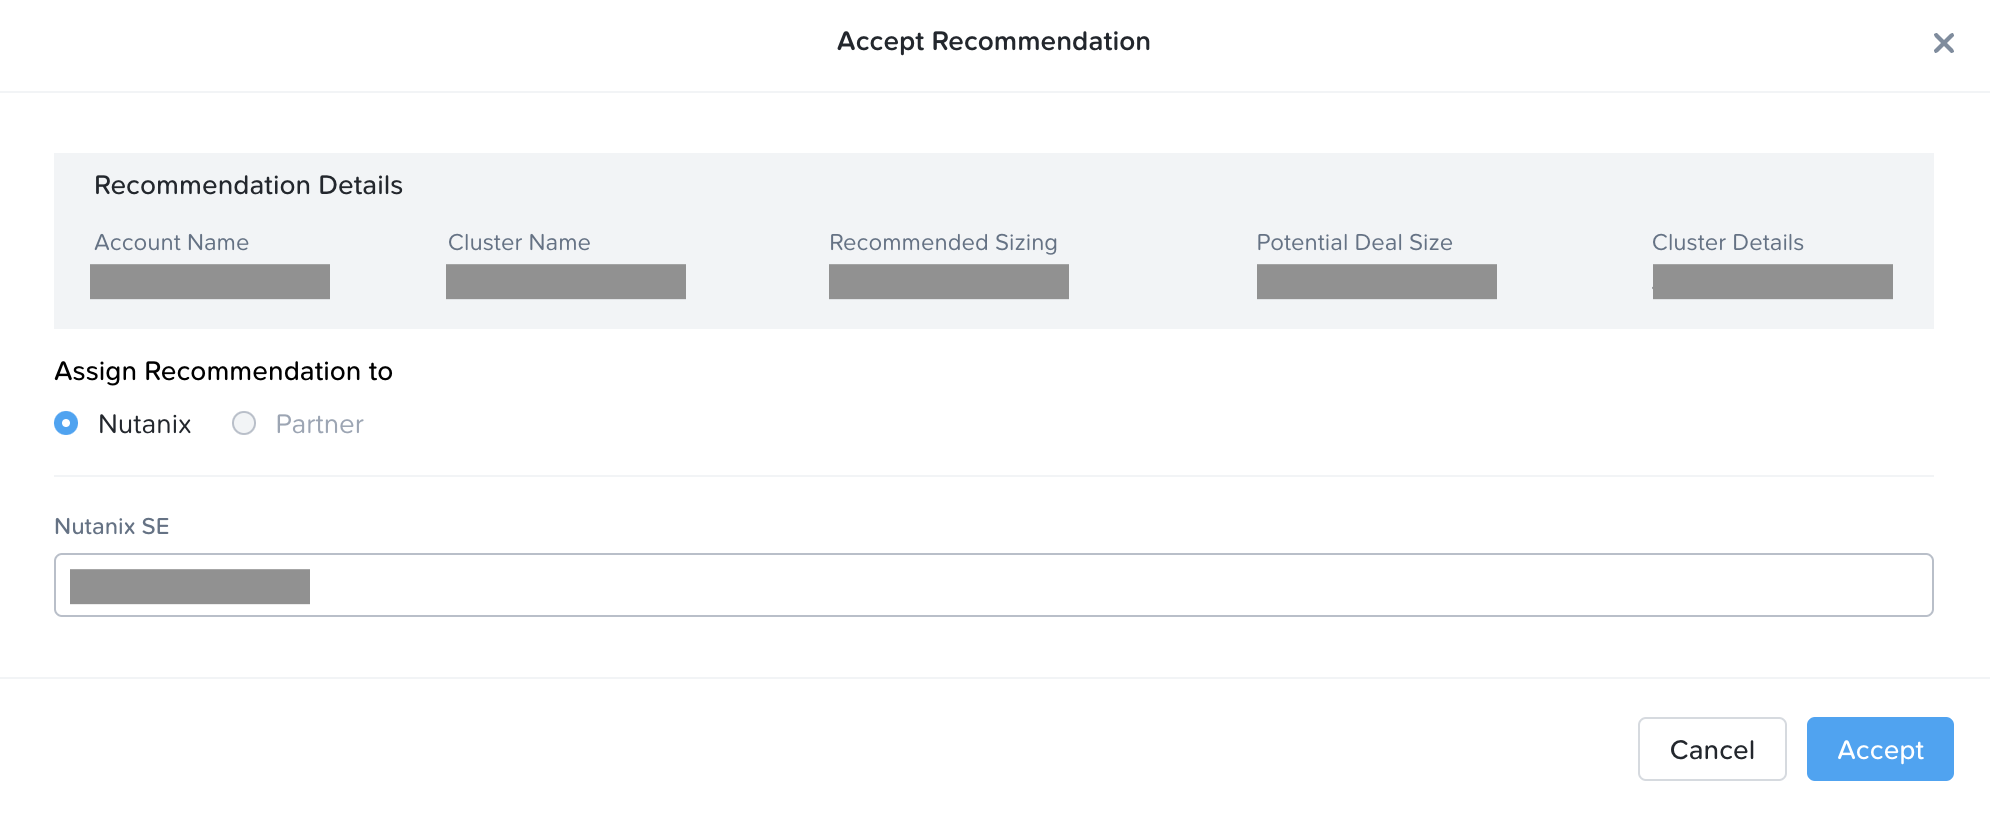
The above screenshot demonstrates assigning the lead to a Nutanix SE. The Account Owner just has to type in the first few characters of the SE name to search, select the SE and then click Accept button.  

Upon accepting and assigning, the lead moves from the “Open” tab to the “Accepted” tab. At the same time, the assignee of the lead would receive an email. Below is a sample email on assigning the lead to Nutanix SE. 
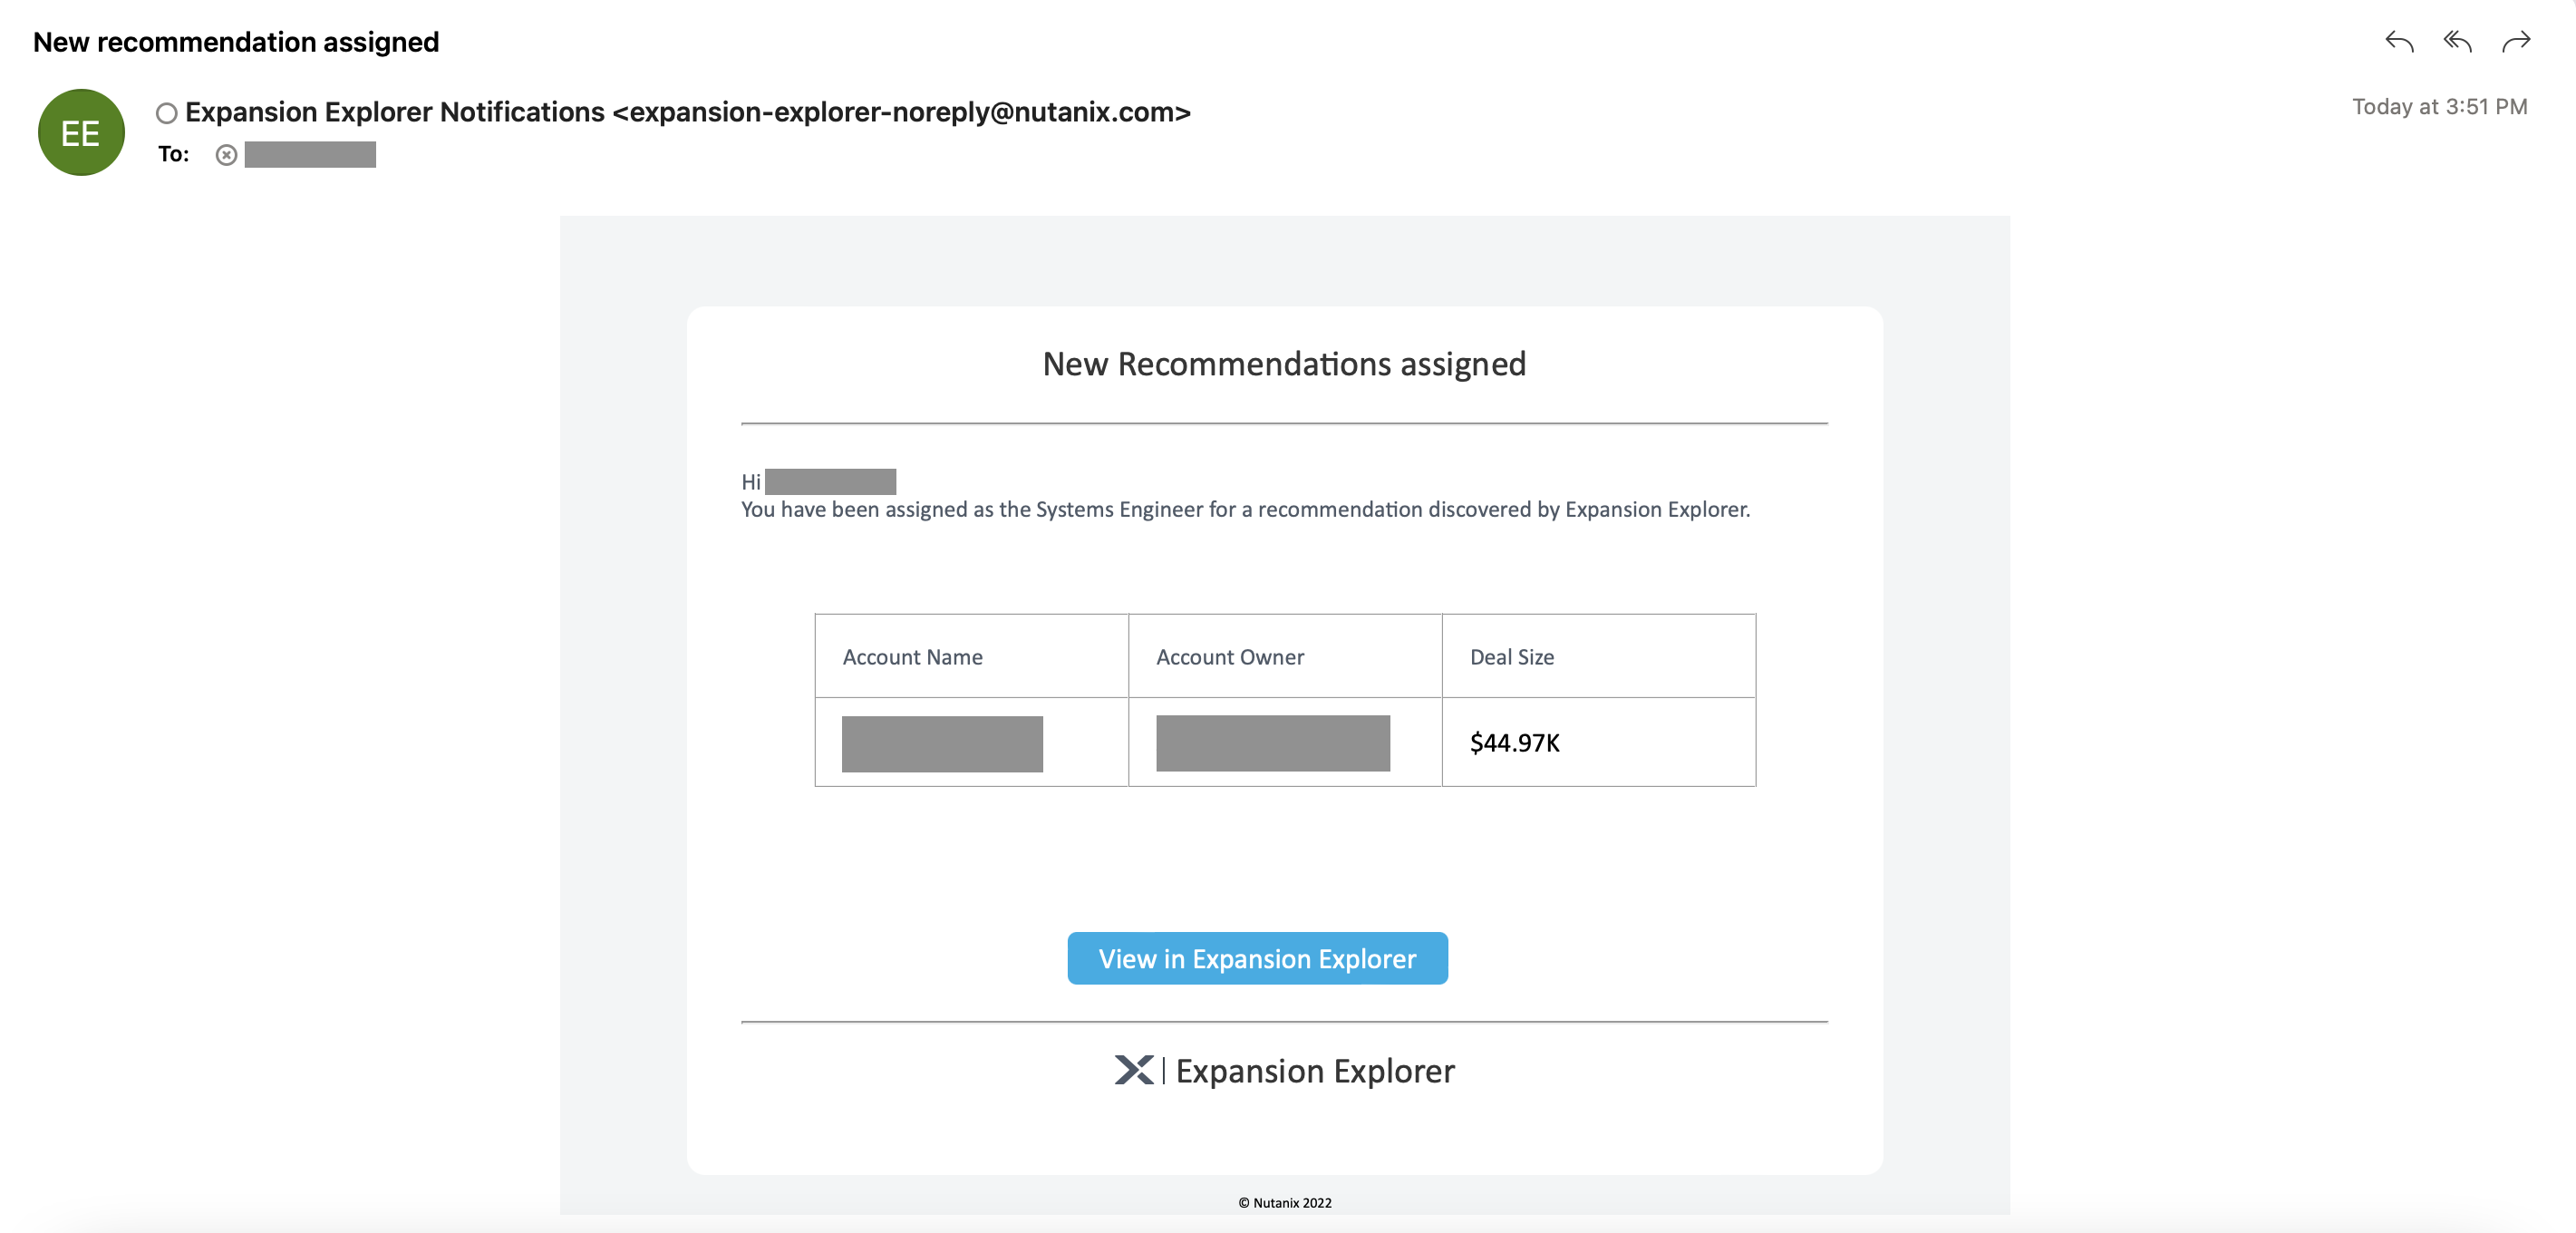
The recipient can then click on “View in Expansion Explorer” or login into Expansion Explorer to view the assigned leads. 

Accepting Leads & pursuing via Partner

The Account Owner can accept a lead by clicking “Accept”. The Account Owner can then go ahead and assign the lead to either Nutanix Systems Engineer and hand it over to a Partner to take it forward. The below screenshot demonstrates assigning the lead to a Partner.
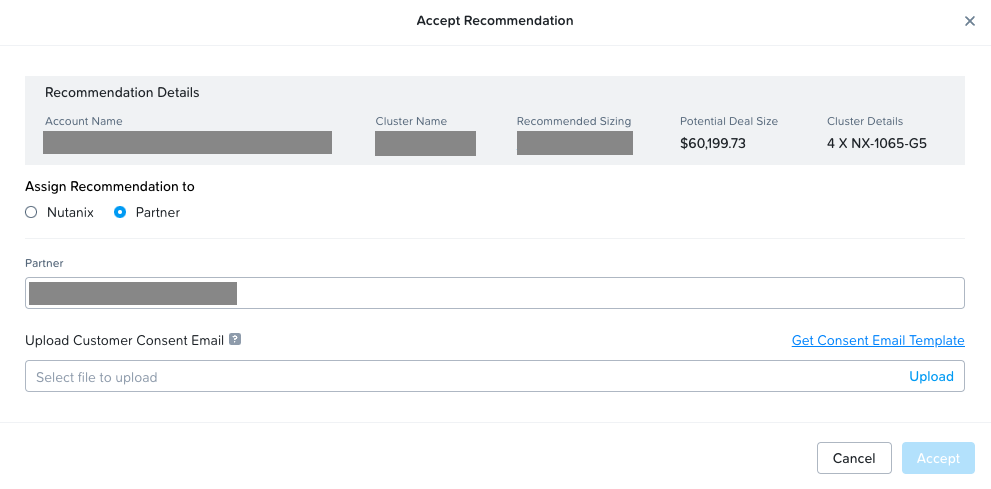
The Account Owner just has to choose the partner from the select list of Partners. Expansion Explorer uses customer Insights data to generate leads, which is considered confidential information of the customer. Sharing customer confidential information with our partners requires consent from the customer. The Account Owner must upload email documentation of customer consent in order to proceed. We have provided a sample email template to get consent from the customer. 

Once the customer consent email is uploaded, the Partner SE & associated Channel SE from the Nutanix side is automatically populated as seen in the screenshot below.
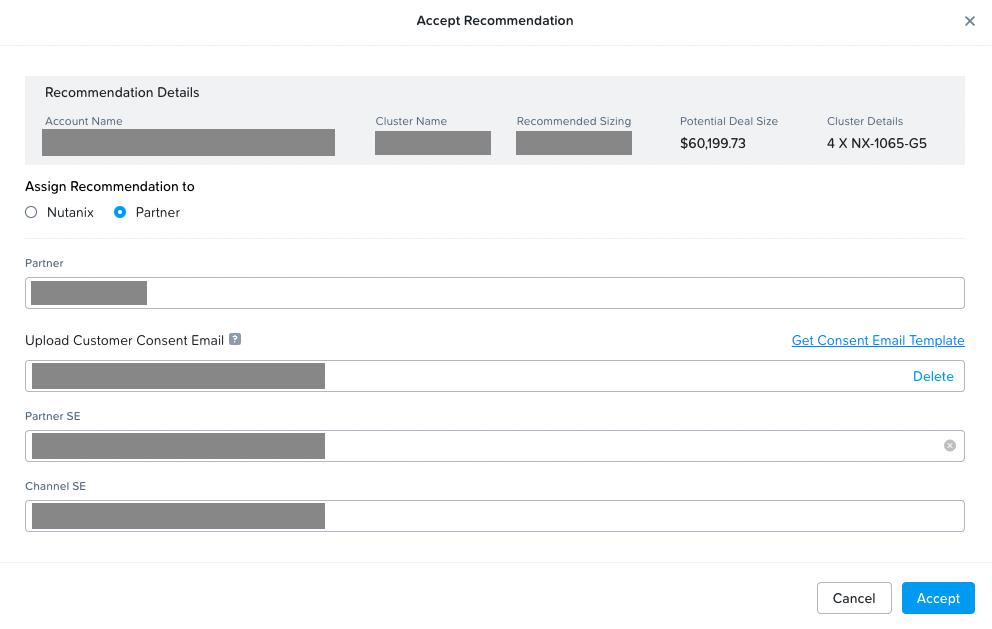
The Account Owner can update the Partner SE or Channel SE if needed before proceeding to accept the lead. Upon accepting, both the Partner SE & Channel SE are notified via email. The lead will show up in their dashboard as well. 

Discarding Lead

In case the Account Owner finds the lead irrelevant, there is an option to discard the lead by clicking on the “Discard” action. The following dialog shall appear and ask for the reason for discarding, the reason provided shall be used to improve the product in the future. 
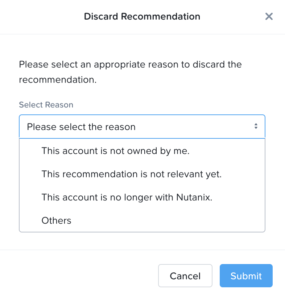
The user can select one of the predefined reasons or select “Others” and optionally provide additional information before submitting. 

Accepted Leads

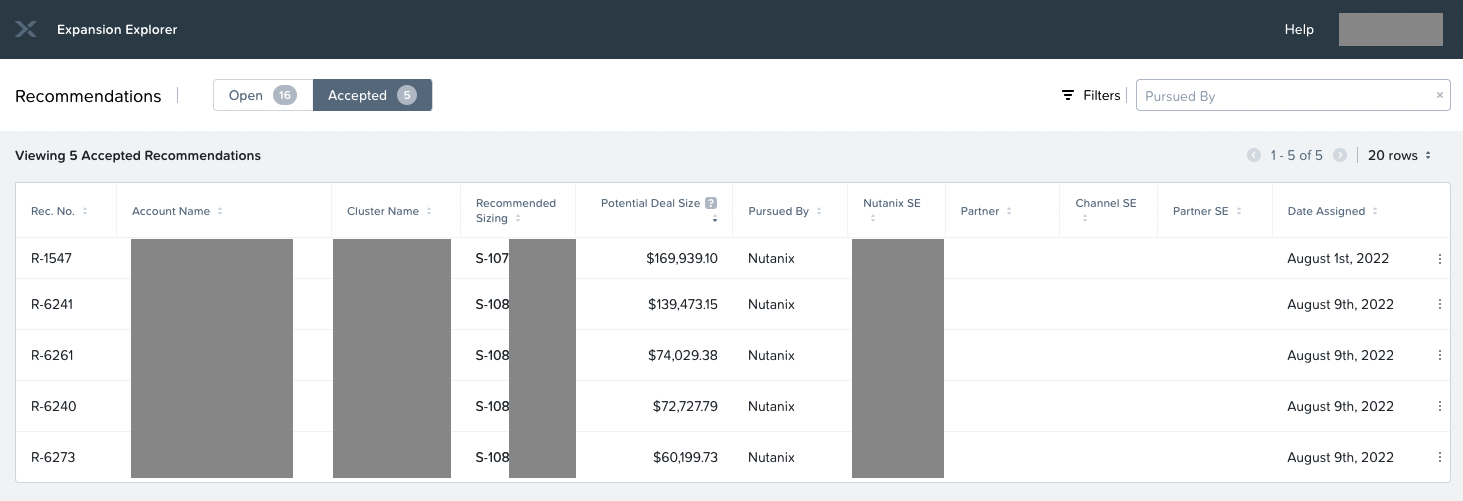
At any time, if the Account Owner wants to view the accepted leads, they can switch to the “Accepted” tab. The “Accepted” tab displays all the information that could be seen in the “Open” tab along with the assignee of the lead. Below is a sample screenshot displaying the “Accepted” tab:
Reassign Lead

The Account Owner can reassign an existing lead if required by clicking on the  ellipsis points and selecting “Reassign”. The below dialog shall appear allowing the user to reassign the lead. 
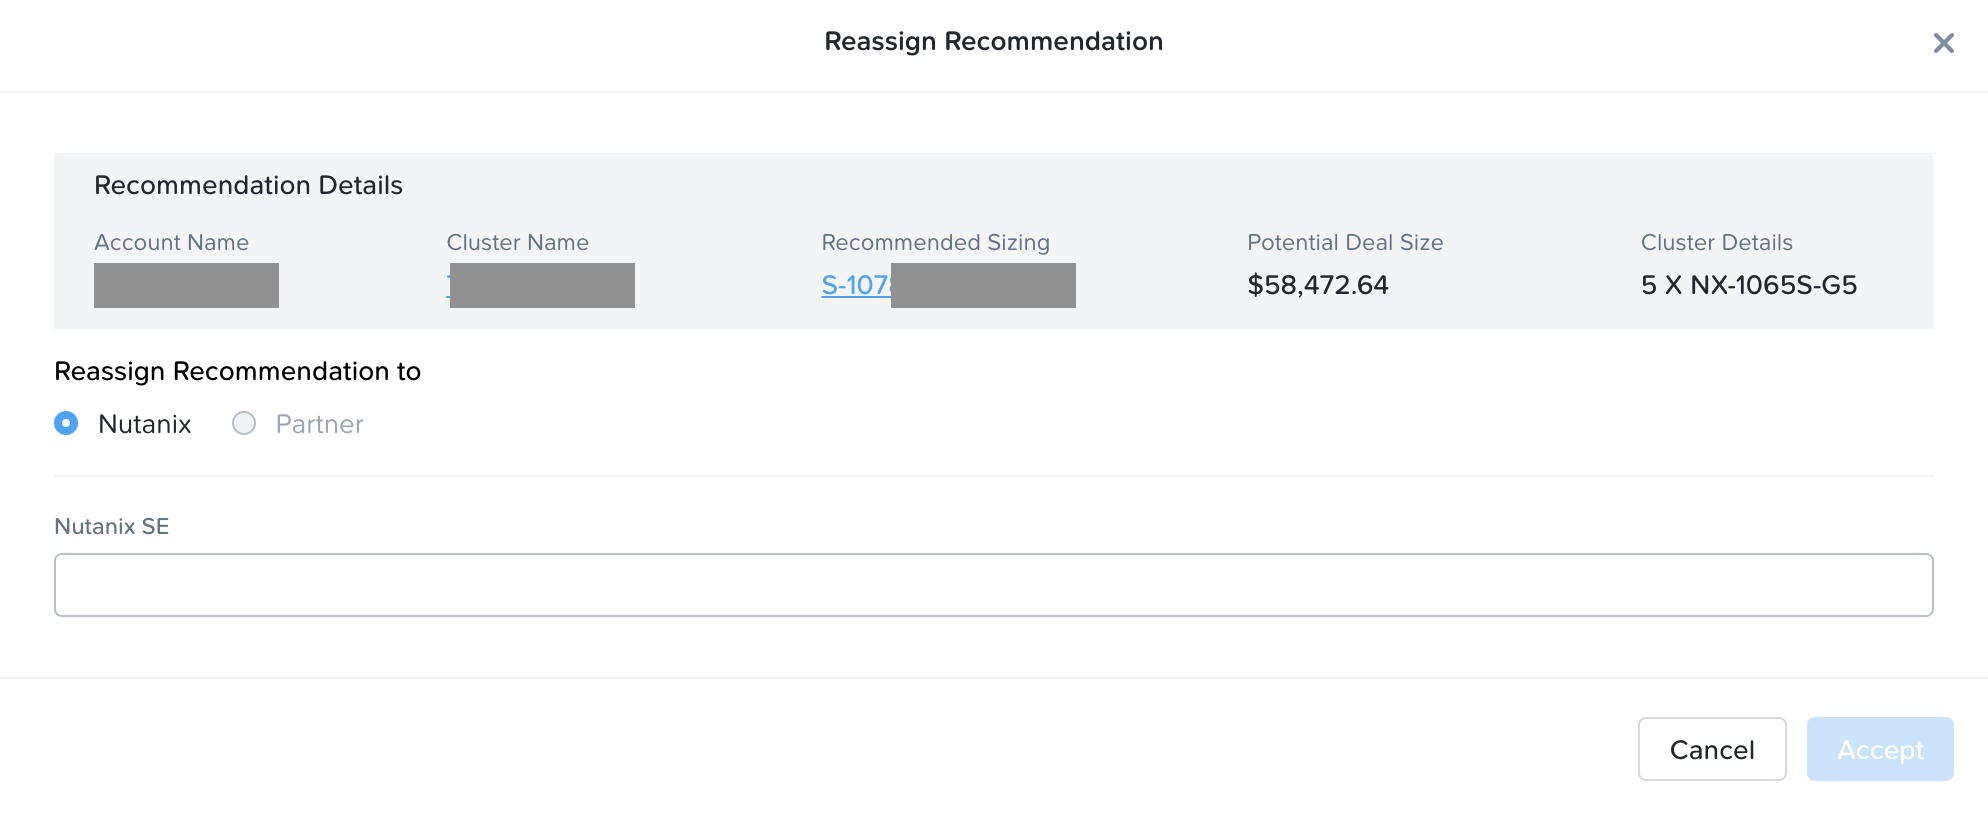
The Account Owner can update the new assignee and the lead is reassigned along with an email notification to the new assignee. 

Optionally, the Account Owner can also decide to discard the lead that is already assigned to the SE. Discarding an assigned lead too can be achieved via ellipsis points and selecting “Discard”. The user will be prompted to provide a reason for discarding the lead. 

Nutanix Systems Engineer Dashboard

The Nutanix Systems Engineer would find leads populated in the Expansion Explorer dashboard when the Account Owner assigns the lead. Similar to the Account Owner, the Nutanix System Engineer can view the below information for each lead:

Column Name Description
Lead ID Unique lead ID for the cluster that needs to undergo a full hardware refresh
Account Name Name of the Account that owns this cluster, the hyperlink redirects the user to the SDFC Account post-authentication. 
Account Owner The Account Owner who is associated with the lead ID. 
Cluster Name Name of the cluster for which the lead is generated, the hyperlink redirects the user to the cluster within Nutanix Insights post-authentication. 
Cluster Details Provides the node quantities and the hardware model that is part of this cluster.
Recommended Sizing A link to autogenerated Sizer solution based on the cluster workload information gathered via Nutanix Insights. The hyperlink redirects the user to the scenario in Sizer post-authentication.
Create Date The date on which this lead was generated by Expansion Explorer.
Potential Deal Size The total list price of the recommended solution including both the hardware and software is recommended by Sizer.
Assigned Date The date on which this lead was assigned to the user. 

Below is a sample screenshot of Nutanix Systems Engineer’s Dashboard
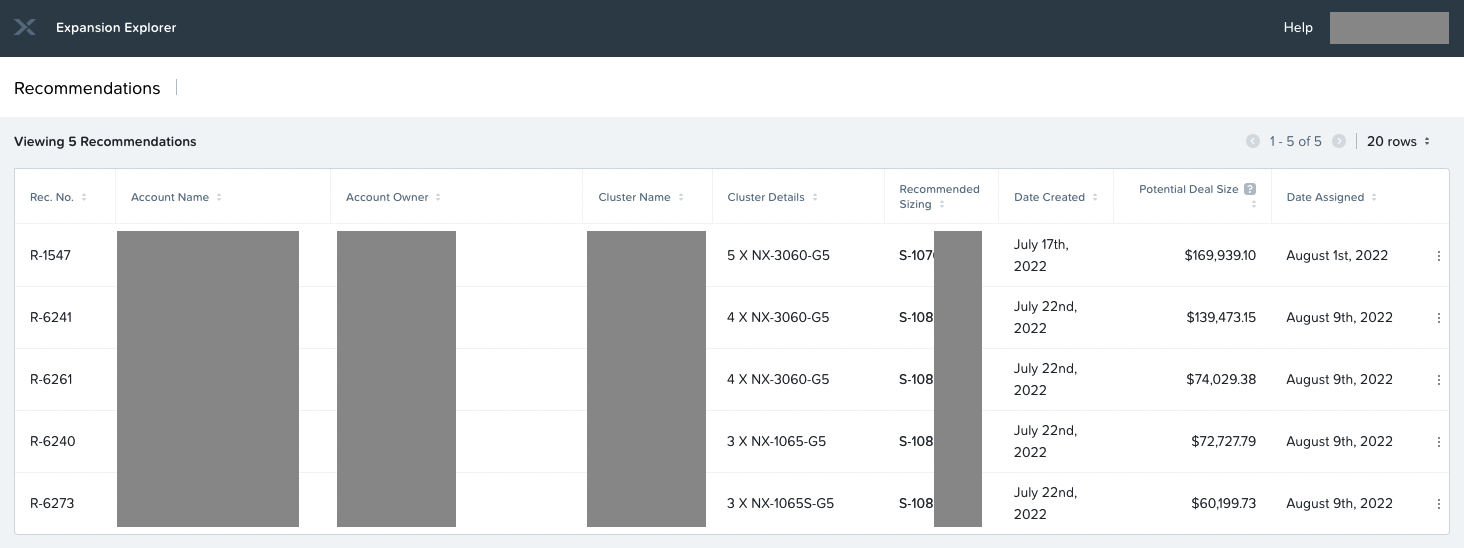
Nutanix Systems Engineer can then refer to the recommended sizing and analyze the workload information and validate if the information is accurate – Refer to “Details about Recommended Sizing”. It is also recommended that the Systems Engineer checks with the customer on any plans to expand or decommission existing workloads. Based on the analysis and discussion with the customer, the SE can tweak the sizing to arrive at a solution that meets the customer’s requirements. 

Reassign Lead

In case, the SE is held with other work, the SE can decide to reassign the lead to a peer SE via ellipsis points and selecting “Reassign”. The below dialog shall allow the SE to reassign the lead. 
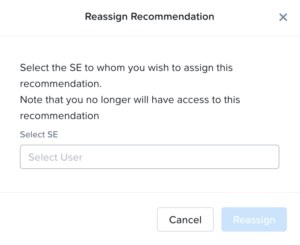
Upon reassignment, the lead will be moved out of the SE’s dashboard and appear in the new assignee’s dashboard. Email notification shall also be sent out to the new assignee about the lead assignment.

Product FAQs

Q. How are the leads being generated?

A: Nutanix Expansion Explorer periodically scans for clusters that are calling back home via Pulse & Insights, and checks if any of the existing customer clusters need a tech refresh. Version 1.0 looks for clusters that need a full tech refresh, subsequent versions of the product will also identify clusters that need a partial node refresh.

Q. How is the “Potential ACV” calculated for the lead?

A: The Potential ACV for a lead is calculated by applying a standard discount on NCI Pro licenses needed for the recommended hardware with Production level support.

Q. How is the “Recommended Sizing” generated?

A: Nutanix Expansion Explorer gathers the workloads that are being run on the clusters that need full tech refresh. Once the workload requirements are gathered, those are then fed to Nutanix Sizer. Sizer then comes up with an optimal solution to run those workloads on the latest NX generation hardware.

Q. Can I see how the solution looks for other hardware vendors?

A: Yes, you can change the hardware vendor of your preferred choice. You can change the hardware vendor on the Sizer scenario to any of the 18+ vendors possible in Sizer including NC2 on AWS and NC2 on Azure.

Q. Why can’t I edit the Sizer Scenario associated with the lead generated by Expansion Explorer?

A: The Sizer Scenario associated with the lead is generated by the system user, “Expansion Explorer” and used for reference. You would need to “Clone” the scenario to edit the workloads and/or solution.

Q. Why can’t I find a few G5/G6 clusters that belong to my account?

A: There are a couple of reasons why you may be missing G5/G6 clusters

  • The clusters are not calling back the data home via Nutanix Pulse & Insights
  • The clusters have other non-G5/G6 generation nodes within them
  • The clusters are already running CBL licenses and there is no incentive for sales reps

Subsequent releases of the product are going to identify clusters that contain a mix of NX-G5/G6 and other generation nodes. For now, you can email us at expansion-explorer-help@nutanix.com or Slack us via #expansion-explorer to generate the leads for you.

Q. How can the Account Owner view the leads already accepted?

A: All accepted leads are moved to the “Accepted” tab, the “Accepted” tab also shows the SEs who are working on the leads. The “Open” tab shows the leads that are new and yet to be acted upon by the Account Owner.

Q. Can I discard an already accepted lead?

A: Yes, if you are the Account Owner you can discard an already accepted lead using the action “Discard”.

Q. How can I view the lead that I discarded by mistake?

A: Unfortunately, you can’t view discarded leads. We do plan to have the option to restore discarded leads in the future. For now, you can reach out to us via Slack or email and we can bring back your discarded lead under the “Open” tab.

Q. How can I update the SE associated with the lead?

A: Both the Account Owner & SE can update the Systems Engineer associated with the lead via the “Reassign” option.

Q. Does Nutanix Expansion Explorer autogenerate SFDC opportunities for discovered leads?

A: No, we do not autogenerate SFDC opportunities. You will have to create an opportunity on your own.

Q. Can I link an existing SFDC opportunity to my leads?

A: Currently, we don’t have the option to create or link an existing SFDC opportunity to the lead in Nutanix Expansion Explorer.

Q. How can I assign the lead to a Partner?

A: The leads generated via Expansion Explorer contain customer confidential data gathered via Nutanix Insights. At this moment, we are not authorized to pass this information to any 3rd party outside Nutanix. We are working with the Legal team to have a process in place to open up passing recommendations to Partners.

Q. When are we going to open up the product for Partners?

A: We are currently working with the Legal team to have a process in place to open the product to Partners. We are going to pilot with a limited set of Partners at GA subject to Legal approval.

Q. When will Nutanix Expansion Explorer GA?

A: Nutanix Expansion Explorer will during SKO, 22-25 Aug. On the Monday following SKO, all Account Owners should be able to view leads if any of their existing accounts’ G5/G6 clusters need a full hardware refresh.

Q. Why is the “Potential Deal Size” of the lead showing as 0?

A: The supply chain situation is pretty volatile and sometimes the hardware parts recommended by Sizer aren’t quotable. This can lead to failure when trying to fetch the deal size. We recommend you clone the scenario and try generating the Frontline or budgetary quote. Failure in the generation of the quote should guide you to the next step and help determine the potential deal size. Feel free to reach out to us via Slack or email in case this does not resolve the issue.

Q. Is there any enablement content for Expansion Explorer?

A: Yes, we have a course on Nutanix University – Nutanix Expansion Explorer

Q. Where can I report issues in the product?

A: You can email us at expansion-explorer-help@nutanix.com or Slack us via #expansion-explorer

Q. How can I give feedback and suggestion?

A: You can slack us at #expansion-explorer or email us at expansion-explorer-help@nutanix.com. You can also feel free to reach the Product Manager via email or Slack.

Sizer 6.0

Sizer 6.0 is the latest version of Sizer (GA – 10th June’2022)

Why Sizer 6.0 ?

As the use cases and adoption of HCI increases and broadens to diverse workloads, the precise sizing and capacity planning becomes more complex requiring deep technical expertise on multiple fronts, including Nutanix technology and the workload being sized for.  However, as Nutanix scales further in commercial and enterprise segments leveraging a vast partner ecosystem, being updated with the latest on Nutanix technology and sizing nuances can pose a challenge.

Sizer 6.0 is addressing this challenge by building capabilities within the tool which would allow users to leverage the technical expertise, driving  consistency and uniformity in sizings/solutions across users, whether internal or partner, and relatively independent of their technical expertise.

The other aspect of Sizer 6.0 is to align with changing nature of cloud deployments. With the businesses moving from pure public cloud  to a mix of public and private (Multi cloud), its important that the related ecosystems and tools align with the new changing .

Sizer 6.0 is built for the Multi cloud era. It can provide on-prem or public cloud solutions or a mix of on-prem and public cloud solution options and let users compare the solution and its pricing and decide on their cloud deployment model.


Whats New?


There are three major highlights to Sizer 6.0 which completely redefines the sizing as it is done today.

1. Cluster templates and libraries: 

  • Expert library of profiles based on best practices 
  • User created profiles based on customer or deployment preferences

2. Multi cloud approach to solutions

  • Enabling workloads for on-prem, bare metal public cloud or a combination(hybrid)
  • Compare budgets for different solutions

3. Workflow redesigned (focused on cluster)

  • Workload -> Clusters -> Solution


Sizer 6.0 features : Deep dive

1. Cluster templates and Expert libraries: 

What is a cluster templates? 

Sizer 6.0 has come up with a concept of cluster profiles. These are specific cluster settings for a sizing.  The cluster profile is user-defined and users can create as many profiles as needed by giving the profiles a unique name.

How does creating a cluster template help ? 

Different types of workloads have different preferences for the recommended solution. For example – a Database cluster would be quite different from a VDI cluster. Whereas a DB cluster would almost always be All Flash or for some SEs even prefer All NVMe nodes, a hybrid node for VDI cluster would be sufficient in most cases. These are different options in the cluster settings that can be set for the given workload by the users.

Another example is preferred set of models. Some customers would like to go with certain models (already existing in their environment) or filter out certain models (for ex: 1065 as it is single SSD).

Currently, SEs change these filters and preferred options in the cluster settings page every time for a new scenario/sizing.

With Sizer 6.0, Nutanix SEs and partners can save these settings (as a cluster template) and use it for future sizings.

For example: There are certain settings a user typically prefer for Oracle

1. Nodes have to be All Flash (or NVMe)

2. Should be a hot processor (>3.0GHz)

3. Only certain models (NX-8050 , NX-8070)

SEs can save an Oracle cluster profile with these settings and import this profile every time they size for an Oracle workload. This helps avoid repeating the settings every time making the sizing process faster and consistent.

Power of Cluster template/Expert Library:

Leveraging Nutanix expertise: 

Why care?


  • Focus on the Workloads with the customer and then let your preferred cluster settings control Auto sizing and yield strong solution


  • Can get more consistency across wide range of Sizer users
  • You don’t have to know all 18 vendors in Sizer (focus on workloads and software and less on HW)
  • Can easily compare multiple vendors

Brings uniformity to solutioning

  • Across different user persona(expert, moderate, beginner)
  • Across internal SEs and partners
  • Removes the need to be Nutanix technology expert or expert of the workload being sized(eg Database)

How do I create a cluster template?

There are two ways to create a user-defined cluster profile in Sizer.

  • Directly creating cluster profile from user preferences
  • Saving an existing cluster setting as profile while doing a sizing

Steps for creating user defined templates:

  • Directly creating template from user preferences

Go to the User icon on the top right corner and click cluster template (pic 1)

Under ‘My Templates’ , click on ‘Create Template’

Click on Create in the next screen (shown below)


Next, on the cluster settings screen, enter a name for the profile (eg Database cluster template) and select settings (certain CPUs, CVM allocations, preferred platforms and many more attributes shown in next section)

Click “Review” and then “Save” the profile which starts showing in the Cluster template dashboard (shown below)

  • Save Template while creating the scenario

To provide flexibility and for users to be ‘in context’ while creating/saving a template, additionally, an option in Sizer is to save a particular cluster setting done for a current sizing/opportunity as a template for applying in future for a similar opportunity or workload type.

This is provided as an option “Save Template” in the cluster settings page. It saves the current settings in the page (user needed to provide a name for the template)  as shown:


Cluster profile attributes:

Below is the list of attributes and filters which can be set for the cluster profiles based on the requirement of the cluster/customer.

Cluster Profile attributes sample values
Data Center models / Robo Models NX 1065-G8/1075S/3060…
Minimum CPU Freq(in GHz) 1.7
CVM per Node
         Cores(physical) 4
         RAM 28
Cluster type Homogeneous
Failover Standard(N+1)
Storage Any
Sizer Policy Production
Threshold %
       CPU 85%
      RAM 85%
      SSD 85%
     HDD 85%
Minimum Networking speed 10G
Minimum SSD per node 1
Minimum socket per node 1
CVM : vCPU:pcore 2
Compression % (default) 30%
ECX OFF

Cluster settings UI in Sizer:

What is an Expert Library ?

Expert library is exactly same as the cluster profiles except that instead of the users defining the cluster profiles themselves, these profiles are created by experts in their respective areas.

The Expert library of cluster profiles is  listed by workloads.  For ex: Database experts know best what an Oracle cluster should look like and apply the settings accordingly. Similarly, there are libraries for VDI, Files , General purpose Server Virtualisation etc.

SEs and partners would just need to apply these libraries during creating a sizing for the respective workload/s  from the cluster settings page (explained in detail in next section).

Expert Library is a separate tab next to the user defined cluster profile in Sizer.

How to use Cluster profiles/Expert libraries ? 

While creating a sizing, on the cluster settings page, click on ‘Apply cluster template’ which pops up the list of user defined profiles and expert libraries. SEs can select any and have a quick view of the set attributes and hit apply. This will automatically select values in the cluster settings screen for the scenario which is being sized.

Similarly, as shown in the below image, using the Save template button, a new Profile can be saved from the cluster settings page of a scenario being sized. This becomes handy for leveraging the work done in manually setting the filters for current sizing for future reference for a new sizing.

For example: If an SE is sizing for a customer BestBuy which prefers certain NX models , SE would need to select only those models in platform list in the Cluster settings page for the given scenario. At the same time, they can save this as a template (say naming it as BestBuy template) and can apply every time when sizing for BestBuy opportunity.

List/View/Apply Cluster template while creating a sizing:


2. Multi cloud solutions:


 The world is moving to a hybrid multi-cloud era where customers would be able to choose between different cloud options based on the requirements and data privacy or regulatory needs.   There may be specific applications or chunks of data that would need to sit on-prem and other applications that could embrace public cloud.

Sizer 6.0 is designed to support this hybrid multi cloud solutions. Prior to 6.0, sizer could either recommend a on-prem HCI solution or on cloud (Clusters on AWS). So the deployments had to be either/or in terms of opting between private cloud/HCI or going public with Clusters on AWS/Azure.

Multi cloud use cases supported in Sizer:

There are several use cases for multi cloud which is supported by Sizer.

For example:

  • Primary workload on on-prem HCI , DR for the same on Clusters on AWS

As you can see from the image below, with Sizer 6.0, we can build a on-prem HCI (on NX ) for primary VDI cluster and a DR setup for this cluster on public cloud(Clusters on AWS), all in the same solution/scenario.

How does supporting multi cloud in Sizer help? 

As seen from the above example, the ability to choose different cloud vendor (and even different HW vendor for HCI) brings flexibility in creating the right solution.   With prior versions, Sizer would force one solution/cloud for both the clusters, the primary VDI and the DR.  So either both VDI and DR clusters would be on on-prem NX or both have to be on public cloud.

However, since DR is emerging as a good initial se case for Clusters on public cloud, while the primary workload still needs to be on-prem for various reasons, it only makes it imperative for the solutioning tools to be able to come up with a multi cloud approach recommending the right cloud for the workload in context.

BOM and Budgetary quoting for Multi Cloud


Prior to Sizer 6.0,  even when the scenario had more than 1 cluster (multi cluster with same HW vendor), the licenses in the BOM and the SKUs and pricing in the Budgetary quote were aggregated across all clusters.

With 6.0, one big change is that the licenses for SW and the HW BOM and the $$ value are split and broken up by Cluster.

This is particularly helpful in the Multi cloud era as it gives insights into the individual cluster’s  cost. While deciding between a mix of on-prem and public cloud options , having the visibility of the costs by cluster for a multi cluster solution would help in estimating the budget and also help in making the decision on the various cloud options

In the image below, there are two clusters:

The primary workload VDI in on-prem on NX and the DR is on public cloud(NC2 on AWS).

Both are listed separately in the BOM and Budgetary quote to give an insight into the license requirement and $$ value for on-prem and cloud deployment.

Multi cluster quoting is also supported for Budgetary quote giving the split of the $$ across the on-prem and cloud.

Each cluster can be expanded to get the break-up across SW/HW as shown below:


The frontline quote also can be seen split by Clusters as shown:

3. Workflow redesigned (focused on cluster)

Sizer 6.0 brings back focus on cluster settings.  Until now, users provided the workload inputs and sizer used to pick the solution based on default cluster settings. However, there are many preferences/filters are available to tweak the clusters to a desired solution. Those were still possible with Sizer 5.0 but as a back step on clicking modify after the default solution was recommended by sizer. This led users to directly switch to manual mode instead and miss out on the precise auto recommendation. The new release will take into account the users desired preference for cluster (ex: certain set of cpus or node types or thresholds etc) for recommending the default solution, thereby reducing the steps  including the need to switch to manual mode and bring the solution closer to their desired preference in one go.

The new flow thus becomes:

Workload inputs -> Clusters settings  ->  Solutions 

The “Save and Review” button on the workload input screen is a mandatory flow which takes to the cluster settings page. Users can choose the vendor as well as any other preference for the cluster before hitting next for the desired solution.

Another benefit of this flow is that users can readily use the templates (newly introduced concept as explained in section 1 above) . Clicking the apply templates will pop-up the option of importing their own or expert cluster template for this sizing during/in the sizing process.

Note that Sizer will mandate reviewing the cluster settings (bring cluster settings UI in the flow) only when the cluster is being created the first time. When adding more workloads to an existing cluster, this step is skipped as user would have already set the preferences during creating the cluster initially.  They can always edit any of the preferences as many times as desired by going to the cluster settings UI upon clicking “modify” button from the solution screen.

Sizer 6.0 demos

Cluster Templates-16Jan2023


Cluster Template: 

Multi Cloud solutions:

Workflow Redesign:


Expert Library:

Collector 4.1

Nutanix Collector 4.1 release is focused on the stability of the data collection, enhancements & bug fixes. Below is a summary of the changes. 

ENHANCEMENTS

Following are the feature enhancements made in this release:

  • ONTAP CIFS Shares

Collector can now identify the storage associated with CIFS Share Home Directories

“Search Path” column is added for CIFS shares configured as home directories, this helps in mapping Volume associated with Home Directories

  • Added Support to report Storage associated via Volume Groups

VolumeGroups sheet now reports all the volume groups that are associated with the discovered VMs – 

vDisk sheet now reports the vDisks that are part of Volume Group. Additional columns under vDisk are – Volume Group Name, Volume Group Disk, Volume Group Shared, Disk UUID, Volume Group UUID

vmList sheet now reports if the VM has Volume Groups attached. Additional columns under vmList are – Volume Group Attached, Volume Group Capacity (MiB) & Volume Group Consumed (MiB)

  • Added support to gather multiple NICs associated with a VM via Prism Element

If a VM supports multiple Network Interface Cards (NICs), the Collector output exported as an XLSX shows all the supported NICs in the vNetwork tab.

COLLECTOR PORTAL ENHANCEMENTS

The below enhancements are available in Collector Portal as part of his release

  • Collector Portal now supports a simple 1-click option to export NetApp ONTAP projects to Size Nutanix Files

Export to Sizer is supported for Collections gathered via Collector 4.1 and later versions

Export to XLSX is supported for Collections irrespective of Collector version

  • When exporting data to Sizer, the “Provisioned Capacity” is the default storage selection

Users are free to switch to “Consumed Capacity”

Defaulting to “Provisioned Capacity” is applied for both compute based workloads and Netapp ONTAP capacity workloads

  • Optimized the process of fetching VM information when dealing with a large number (1K+) of VMs
  • Improved the histogram chart under the VMs Summary tab by ignoring the powered OFF VMs when showing the distribution of VMs by CPU utilization. 
  • Collector provides a specific error message and suggests actions when the user is not registered on the Sizer portal and tries to export Collector Project to Sizer. 

RESOLVED ISSUES

The following issues are resolved in this release:

  • Resolved an issue where the Collector Portal was unable to generate an XLSX file when NetApp ONTAP Volume did not report Consumed Capacity & Snapshot Reserved Capacity.
  • Significantly improved the time taken to gather information via Prism when Collector is unable to gather Guest OS information.
  • Resolved an issue with Data Collection when gathering data via Prism due to the failure of Prism APIs. 
  • Resolved the cluster connection issue when trying to gather data via the Prism version AOS 5.15.4
  • Data collection completes successfully when clusters intermittently fail to report performance data.  
  • Resolved an issue in collecting the vNetwork data for AOS 5.20.2.1 (AHV – 20201105.2244) and higher versions.
  • Resolved the data center name identified by the Collector for the Prism Element clusters.

RESOURCES

Short Demo link: Collector ONTAP Export to Sizer

CALL TO ACTION

Simplify your requirement gathering by downloading Collector

Download Collector via Collector Login Page

Public URL: Collector Download Link for Prospects

MyNutanix URL: Collector Download Link for MyNutanix Users 

Report issues in Collector via this Google form

Thank you,

Team Nutanix Collector

Nutanix Validated Design (NVD) – On-Prem

Nutanix Validated Design – On-Prem  :

The

Nutanix delivers the Hybrid Cloud Validated Design – On Premises, based on the Hybrid Cloud Reference Architecture, as a bundled solution for general server virtualization that includes hardware, software, and services to accelerate and simplify the deployment and implementation process. This Validated Design features a full-stack solution for hybrid cloud deployments that integrates multiple products including AOS, AHV, Prism Pro, Calm, Flow, Leap, Mine, and HYCU.The Hybrid Cloud Validated Design – On Premises sizer reference scenarios have the following features:


  • A baseline configuration for each Availability Zone is comprised of three clusters:
    • Management – 4-node cluster based on NX-1175S for Prism Central, Active Directory, IPAM, Load Balancing, SYSLOG, and any other management services.
    • Workload – 4-16 nodes of NX-3170-G8 for general purpose server virtualization workloads.
    • Backup – 4-node cluster of NX-8155-G8 for Mine/Hycu


A dedicated management cluster in each Availability Zone provides increased availability, security, operations, and performance. The workload cluster has a defined maximum size of 16 nodes, which provides a reasonable maintenance window for rolling firmware and software upgrades. Smaller workload clusters can be deployed, but the maximum size should not exceed 16 nodes.


  •  NVD Defines standard VM “t-shirt” sizes for deployment via Calm:


Small Medium Large
1 vCPU 2 vCPU 4 vCPU
8 GB RAM 16 GB RAM 32GB RAM
50GB SSD 100GB SSD 200GB SSD
Max 124 VMs/Node Max 92 VMs/Node Max 46 VMs/Node


  • When using the defined VM sizes, the per-workload cluster maximums are:


Small VMs Medium VMs Large VMs
Maximum running VMs per workload cluster building block 1,860 1,380 690
Maximum deployed VMs per workload cluster building block to allow for disaster recovery capacity 930 690 345


  • Due to quoting limitations, a single Availability Zone has two sizer scenarios: Management + Workload cluster, and Backup Cluster. Note that the Hycu software license is not included, and must be purchased separately via other channels. 
  • Services SKUs are not included in the Sizer reference scenarios. Review the BOM in the NVD appendix for the complete list of Services SKUs which should be included.
  • For a full Disaster Recovery solution, two AZs should be quoted which mirror each other. The design should call for running each workload cluster in the AZ at less than 50% capacity, to enable full fail-over capability for all workloads. 


It is extremely important to review the entire <doc name> on the Solutions Support portal to understand the complete Hybrid Cloud validated solution. 


For questions or additional information: