NVD for OpenShift

Nutanix Validated Design – AOS 6.5 with Red Hat OpenShift


Nutanix delivers the Validated Design – AOS 6.5 with Red Hat OpenShift as a bundled solution for running Red Hat OpenShift 4.12 that includes hardware, software, and services to accelerate and simplify the deployment and implementation process. This Validated Design features a full-stack solution for hybrid cloud deployments that integrates not only products like Nutanix NCI and NUS but also Red Hat OpenShift Platform Plus including Red Hat Quay and Advanced Cluster Manager.The Validated Design – AOS 6.5 with Red Hat OpenShift sizer reference scenario has the following features:


A baseline configuration for each Availability Zone is comprised of three clusters:

Management – 4-16 nodes cluster based on NX-3170-G8 for Prism Central, Active Directory, OpenShift Hub Cluster for Quay Registry and Advanced Cluster Manager, and any other management services including OpenShift Controlplane when using “large footprint” layout.

Workload – 4-16 nodes of NX-3170-G8 for Red Hat OpenShift Workloads.

Storage – 4-node cluster of NX-8155-G8 for Nutanix Files and Nutanix Objects.


A dedicated management cluster in each Availability Zone provides increased availability, security, operations, and performance. Management Cluster starts with 4 nodes and can be scaled up to 16 nodes if multiple “Large Footprint” OpenShift Clusters should be deployed.


The workload cluster has a defined maximum size of 16 nodes, which provides a reasonable maintenance window for rolling firmware and software upgrades. Smaller workload clusters can be deployed, but the maximum size should not exceed 16 nodes.


 NVD defines two footprint for OpenShift Cluster Sizes:

  • Small Footprint, OpenShift Controlplane shares same workload cluster as worker nodes, maximum of 25 worker nodes
  • Large Footprint, OpenShift Controlplane runs in Management Cluster, worker nodes are running in workload cluster

Table: OpenShift Cluster Sizing: OCP Cluster (Workload) Small Footprint

Component Instances Size
Control plane 3 4 CPU cores, 16 GB
Infrastructure 3 4 CPU cores, 16 GB
Worker 2+ (max 25) 4 CPU cores, 16 GB

Table: OpenShift Cluster Sizing: OCP Cluster (Workload) Large Footprint

Component Instances Size
Control plane 3 16 CPU cores, 128 GB
Infrastructure 3 16 CPU cores, 128 GB
Worker 2+ (max 360) Minimum 4 CPU cores, 16 GB


  • Services SKUs are not included in the Sizer reference scenarios. Review the BOM in the NVD appendix for the complete list of Services SKUs which should be included.

It is extremely important to review the entire Validated Design – AOS 6.5 with Red Hat OpenShift on the Solutions Support portal to understand the complete validated solution. 


For questions or additional information:


Nutanix Validated Design (NVD) – On-Prem

Nutanix Validated Design – On-Prem  :

The

Nutanix delivers the Hybrid Cloud Validated Design – On Premises, based on the Hybrid Cloud Reference Architecture, as a bundled solution for general server virtualization that includes hardware, software, and services to accelerate and simplify the deployment and implementation process. This Validated Design features a full-stack solution for hybrid cloud deployments that integrates multiple products including AOS, AHV, Prism Pro, Calm, Flow, Leap, Mine, and HYCU.The Hybrid Cloud Validated Design – On Premises sizer reference scenarios have the following features:


  • A baseline configuration for each Availability Zone is comprised of three clusters:
    • Management – 4-node cluster based on NX-1175S for Prism Central, Active Directory, IPAM, Load Balancing, SYSLOG, and any other management services.
    • Workload – 4-16 nodes of NX-3170-G8 for general purpose server virtualization workloads.
    • Backup – 4-node cluster of NX-8155-G8 for Mine/Hycu


A dedicated management cluster in each Availability Zone provides increased availability, security, operations, and performance. The workload cluster has a defined maximum size of 16 nodes, which provides a reasonable maintenance window for rolling firmware and software upgrades. Smaller workload clusters can be deployed, but the maximum size should not exceed 16 nodes.


  •  NVD Defines standard VM “t-shirt” sizes for deployment via Calm:


Small Medium Large
1 vCPU 2 vCPU 4 vCPU
8 GB RAM 16 GB RAM 32GB RAM
50GB SSD 100GB SSD 200GB SSD
Max 124 VMs/Node Max 92 VMs/Node Max 46 VMs/Node


  • When using the defined VM sizes, the per-workload cluster maximums are:


Small VMs Medium VMs Large VMs
Maximum running VMs per workload cluster building block 1,860 1,380 690
Maximum deployed VMs per workload cluster building block to allow for disaster recovery capacity 930 690 345


  • Due to quoting limitations, a single Availability Zone has two sizer scenarios: Management + Workload cluster, and Backup Cluster. Note that the Hycu software license is not included, and must be purchased separately via other channels. 
  • Services SKUs are not included in the Sizer reference scenarios. Review the BOM in the NVD appendix for the complete list of Services SKUs which should be included.
  • For a full Disaster Recovery solution, two AZs should be quoted which mirror each other. The design should call for running each workload cluster in the AZ at less than 50% capacity, to enable full fail-over capability for all workloads. 


It is extremely important to review the entire <doc name> on the Solutions Support portal to understand the complete Hybrid Cloud validated solution. 


For questions or additional information:


Storage Calculator

Storage Calculator is both a standalone tool as well as a Sizer feature.  Either way it is used to determine the Extent Store and Effective Capacity of a configuration the user defines.  It is NOT tied to the workloads or the recommendation in the sizing scenario.

Access as a Standalone Tool

This is available on the Internet without login.  The same as DesignBrewz.

https://services.nutanix.com/#/storage-capacity-calculator

Access as a Sizer Feature

This is accessed by clicking on Storage Calculator in upper right corner of Sizer user interface

Storage Calculator

Here is Storage Calculator.

The purpose of Storage Calculator is to determine either the Extent Store or the Effective Capacity of a configuration.  As mentioned it is not tied to a sizing scenario.

  • Extent Store is the amount of storage remaining after discounting for CVM.  This is amount available for customer workloads.
  • Effective Capacity is then Extent Store * Storage Efficiency  + Erasure Coding savings you expect.   Storage Efficiency is either none, 1.5:1, or 2:1.  Examples of storage efficiency is compression and dedupe.

Defining the Configuration and Input Settings

Here are the inputs

  • SSD Size –  Pulldown with common SSDs currently available in various vendor models
  • SSD is downstroked –  If selected each drive loses 80GB for downstroking.  Sizer does that in its sizing for regular SSDs but assumes no downstroking is needed for encrypted drives
  • SSD quantity –  This is the number of SSDs you expect in model you are sizing.  Minimum is 1 as always need a SSD for parts of CVM
  • HDD Size –  Pulldown with common HDDs currently available in various vendor models
  • HDD quantity –  This is the number of HDDs you expect in model you are sizing.  Min is 0 in case of All Flash
  • Node Count –  Number of nodes you expect
  • Replication Factor –  Can be RF2 or RF3
  • ECX – If selected then see the % of Cold Data input
  • % of Cold Data – If select ECX then this input appears and is the percentage of cold data you are expecting
  • Storage Efficiency –  This is the factor you expect for storage efficiency and can be none, 1.5:1, or 2:1.
  • Calculate Button –  NOTE: must click on calculate when make any changes above

Storage Calculator Charts

Total Usage

  • The left donut chart shows the Extent Store and the CVM.  Extent Store is adjusted for either RF2 or RF3 depending on the input selection.  So here the extent store is adjusted for RF2 and is 7.26 TiB.  The total amount of Extent Store is 2x that amount or 14.52 TiB.  The adjustment was made so the customer sees amount of storage they have given the Replication Factor they prefer.
  • The right donut breaks out all the CVM pieces be it stored on HDD or SSD
  • Effective Capacity is above the charts.  It is Extent Store * Storage Efficiency Factor + ECX savings.  Again we adjust for RF level.  This capacity then represents the storage available to customers at their preferred RF level and including expected benefits from storage efficiency as as well as ECX.

SSD Usage

This is a supplemental graph from Total Usage.  It breaks out just the SSD portion of the Total Usage.

  • Top graph shows SSD CVM and SSD Extent Store adjusted for either RF2 or RF3
  • Lower graph shows all the SSD CVM elements.

HDD Usage

This is a supplemental graph from Total Usage.  It breaks out just the HDD portion of the Total Usage.

  • Top graph shows HDD CVM and HDD Extent Store adjusted for either RF2 or RF3
  • Lower graph shows all the HDD CVM elements.


What do the letters in the SSD drive indicate?

The letters indicate different levels of endurance in terms of Drive Writes per Day (DWPD).  For example, 3DWPD means you can rewrite all the data on the drive 3 times a day for its entire life that it is warranted for.

Login Information and Vendor Support

This is a common concern with various users as they will see different login approaches and vendor support

Login Approaches

My Nutanix Login –  This is for registered partners and for all Nutanix employees.  Most sizings will be done using this login approach.  You can do a complete sizing including generating a BOM or budgetary quotes.    You can not attach a BOM to a SFDC opportunity or generate a quote in SFDC.

Salesforce Login –  This is for Nutanix employees with SFDC Account.  This is used by Nutanix field who has access to SFDC.  You can do a complete sizing including generating a BOM or budgetary quotes.    You also can attach a BOM to a SFDC opportunity or generate a quote in SFDC.

Vendor Support

When you create a scenario you select what vendor the scenario should use, meaning their models.  Nutanix employees have access to all current vendors.

Partners often have to be registered partners with a given vendor.  When a partner logs in via My Nutanix their roles are retrieved and only those vendors are allowed.

Partners that feel they should be registered for a given vendor can send email request to:  partnerhelp@nutanix.com

Prospect Sizer

For customers we do have Prospect Sizer.  Same Sizer which is updated when we post a new sprint but with limitations

  • Intended for a prospect to get an initial sizing for a Nutanix solution
    • Not intended to be the final configuration to get a quote
    • Not intended to provide full sizer capability  where competitors can see what Nutanix partner will most likely  bid
  • What it can do
    • Get a sizing for VDI, RDSH/XenApp, Server Virtualization, RAW
    • Allow the prospect to do some sizings within 3 day period
  • What it can not do
    • No financial analysis or financial assumptions.
    • No sizing details
    • Set to homogenous sizing only (no mixed or manual)
    • Standard sizing only (not aggressive or conservative)
    • No BOM
    • Limited to 3 scenarios and 3 workloads per scenario maximum
    • List pricing used for determining recommendation (not margin)
    • No customization allowed
    • No Resiliency and Availability section

To access Prospect Sizer the customer should go here

https://productsizer.nutanix.com

If they have not registered or need to re-register they will be directed to the registration page

RVTool Import into Sizer

RVTools overview

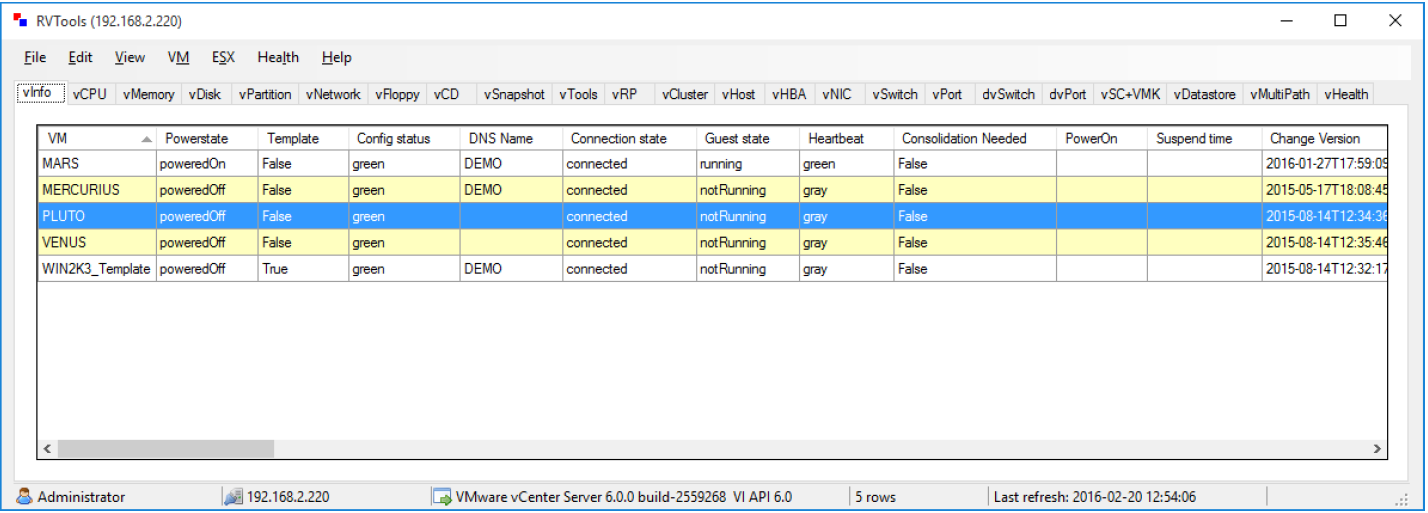
RVtools is a leading tool to monitor VMware clusters.  It is an free tool, that runs on Windows (.Net 4 application), can query VMWare’s  VI (Virtual Infrastructure) API to get numerous attributes. The VI API is exposed as a Web service, running on both ESX Server and VirtualCenter Server systems.

As you can see from the screenshot below, the tool has a number of tabs capturing the details in tabular format.

Steps for using RVTool in Sizer


  • The NTNX SE or Partner SE  to install the supported version of RVtools from Robware on their laptop.  Alternatively, the customer often has it installed and gives the SE the final excel file.
    • If SE runs it on their laptop, they would need permission and cooperation with the customer to have it point to VCenter or ESX. User/password is needed and must not be blocked by a firewall.   This can be a big issue and so could be best to have the customer running RVtools.
    • If customer gives final excel output, SE still needs customer to agree that configuration can be shared.
    • The command line to run the tool and create the excel output is included in this document.
  • Once the SE has the Excel output, they will import it into Sizer which will group most of the  VMs into one of 25 profiles.
  • Sizer will then return an excel with a Sizer_summary tab which has key information but also what profile is applied or “not covered”
  • The user should review this with the customer and especially those not covered by a profile.  They are very high in either CPU or RAM or Total capacity. Do they need to be that high? If so the user would create custom workload.

Does Sizer accounts for all the VMs imported by RVTool?

No. Sizer corresponds to only those VMs for which the ‘covered’ column in RVTool summary report is ‘Yes’.

There are couple of parameters based on which some VMs might not be covered and Sizer does not size for these VMs.

        Powerstate flag

  • A customer may have many VMs and often some are defined but turned off are actually dormant.  Automatically sizing all VMs could cause Sizer to oversize the environment. Conversely, some of the VMs that are powered down may be applications that are used occasionally and need to be sized.
  • We use the powerstate flag.  SE should discuss with customer. If they feel it will be migrated but was off when the tool was run they should change flag to poweredOn.
  • Conversely changing that flag to poweredOff will tell Sizer to not size it

       Workload profiles

  • From vParition sheet in RV tools , we read two columns – Capacity MB and Consumed MB .
  • Calculate total of Capactity MB and total Consumed MB for any VM as a VM can have multiple partitions.
  • If the VM is thick provisioned, we consider Capacity MB, if thin provisioned, Consumed MB is used for calculation.
  • Then we do Groupings of VM based on CPU and RAM (example Small CPU and Small RAM).
  • Storage capacity requirement for the group (Small CPU and Small RAM) is calculated as the average of the total capacity of the VMs that are part of the group
    • Use Capacity MB for thick provisoned VM and Consumed MB for thin provisioned VM for the calculations.
  • Sizer will try to group the VMs into one of 25 workload profiles.  If the VM has simply higher capacity, CPU, RAM requirements than any of the profiles, then Sizer will flag that for user review.  The user can either assume it was over-provisioned and go with one of the profiles or create a custom workload for that larger VM.

How are the usable capacities determined for VMs?

From Vparition sheet in RV tools , we read two columns – Capacity MB and Consumed MB.

Finding capacity for Sizing: 

  • If Thin = True, then we use Consumed for Final Capacity
  • If Thin =False, then we go with Capacity for Final Capacity
  • (Note: Thin variable comes from vDisk tab)
  • We group VMs into categories such as Small CPU, Small RAM
  • We create a list of VMs for those that are Thin and those that are thick provisioned.  So we can have Small CPU and Small RAM that are thin provisioned and those that are thick provisioned.  
  • In each group in each list we then go with the max cap value of all those VMs and apply 90% HDD and 10% SSD

What are the prerequisites for running the RVTool? 

Its a windows application running on a desktop or laptop with network connectivity to the cluster that is being analyzed.  It would need vCenter userid and password to connect to the cluster.

How Sizer creates workload using RVTools data ?


  1. User will  import the RVtools excel into Sizer.  There is a upload file button on Import Workloads page.
  2. Sizer will pull all the info for each poweredOn VM
  3. Sizer will see if the VM fits one of the 25 profiles. It will try to fit the VM in the smallest one that still fits.
  4. Sizer will then create an excel sheet with the sizer_summary tab.  It has all the info Sizer grabbed info and state the profile that was selected or “not covered”

What does CPUs column mean in the RVTool sumary sheet ?

The values for the CPUs column in the Sizer summary sheet  indicate the CPU profile for the VM.

As explained above, every VM is classified as small, medium , large etc as per the vCPU count of the VM as below:

VCPU

  • Small = 1
  • Medium = 2
  • Large = 4
  • X-Large = 8
  • XX-Large = 16

On what basis is the VM  vCPU and vMemory classified ?

Below is the classification criteria for VM vCPU and memory

VCPU

  • Small <= 1
  • Medium <= 2
  • Large <= 4
  • X-Large <= 8
  • XX-Large <= 16

RAM

  • Small = <1.024GB
  • Medium <2.048 GB
  • Large <8.2 GB
  • X-Large <16GB
  • XX-Large <32 GB


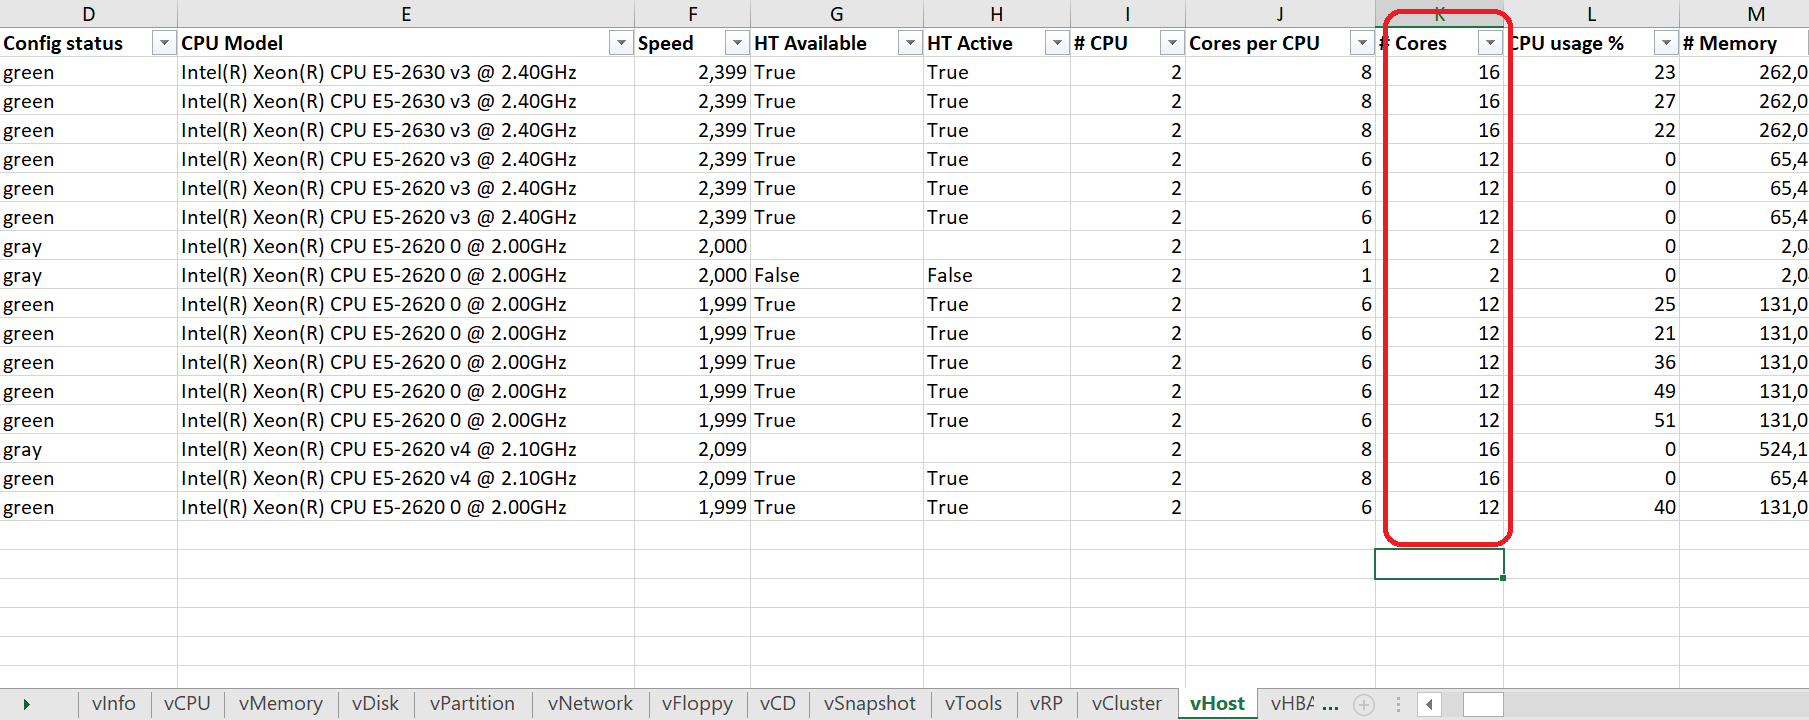
What does Cores column mean in the RVTool sumary sheet ?

These indicate the total number of cores available in the host machine of the VM. These are collected in the vHost tab of the RVTool export.

What happens to the VMs which are not covered as it does not fit in one of the 25 server virtualization profiles?

Analysis has shown about 85% of the VMs fit in these 15 server virtualization profiles. For a handful of VMs that does ont fit in the profile, SEs can review the VMs with the customer. Often some VMs are over provisioned and would fit in one of the profiles.

These changes need to be made manually to the RVTool excel and imported to Sizer for a revised sizing summary.

How do I handle errors associated with importing RV tools?
Make sure you used the latest version of RVTools and that the output has not been tempered with. Also, make sure you have read/write rights on the file before uploading.

Oracle AWR support

Oracle provides Automatic workload repository (AWR) , a diagnostic tool with Oracle as a licensed feature.  This feature is available on all OS platforms. Solaris , AIX , HPUX ,Linux and Windows and will run on all the platforms.

Nutanix has a platform agnostic script (.SQL) which is used to gather information on the server running Oracle in the following format.The script will be run by an oracle DBA/admin on multiple hosts/VMs and a similar output (dbname.out) is obtained depending on the situation.  Multiple dbnameXX.out files are generated, one per database.

If we are provided a mixed output of .out files from AIX , Solaris , HPUX or Linux , we should be able to put these together into an Excel sheet and size it.

The user can then import the awr .out file or a zip file with multiple awr files (more common) into Sizer

Sizer will then do two things :

  • Process the awr file(s) and create appropriate oracle workloads per this document
  • Provide user with an excel summary file with details on the resulting workloads

AWR file structure

 AWR files do end with .out file extension but are text files. Here is a sample

This sample shows one clustered database where same database is run on multiple hosts.  

Information in an AWR we use for sizer

    • NUM_CPU_CORES_PER_NODE – this is used to determine cores in Oracle workload.
    • INSTANCES – will tell us if clustered when greater than 1
    • DB_NAME – used to name the Oracle workload
    • TOTAL_CORE_COUNT –  Not used as not always in AWR
    • HOSTS – This is needed to determine cores for the Oracle workload
    • PHYSICAL_MEMORY_GB_PER_NODE –  this will be the RAM requirement in the workload.  
    • Database_SIZE_GB –  this will be the database storage.  

How does Sizer come up with the core/ram/storage requirement for the given AWR file (or multiple files in a zip)

Each DB instance (per .out file) is a workload.  Its core/ram and capacity requirements from the awr file becomes the sizing requirements for that workload. 

However, a key point to note here is that due to  the way Oracle is licensed [for the entire cores of the host],  multiple DB instances on the same host are not treated as separate workload with separate core/ram requirements. The workload is at host level with the core and ram for the host as the core and ram requirements for the workload. The storage capacity across all DB instances on the host becomes the stoarge requirement for the workload.