Sizer 6.0 is the latest version of Sizer (GA – 10th June’2022)
Why Sizer 6.0 ?
As the use cases and adoption of HCI increases and broadens to diverse workloads, the precise sizing and capacity planning becomes more complex requiring deep technical expertise on multiple fronts, including Nutanix technology and the workload being sized for. However, as Nutanix scales further in commercial and enterprise segments leveraging a vast partner ecosystem, being updated with the latest on Nutanix technology and sizing nuances can pose a challenge.
Sizer 6.0 is addressing this challenge by building capabilities within the tool which would allow users to leverage the technical expertise, driving consistency and uniformity in sizings/solutions across users, whether internal or partner, and relatively independent of their technical expertise.
The other aspect of Sizer 6.0 is to align with changing nature of cloud deployments. With the businesses moving from pure public cloud to a mix of public and private (Multi cloud), its important that the related ecosystems and tools align with the new changing .
Sizer 6.0 is built for the Multi cloud era. It can provide on-prem or public cloud solutions or a mix of on-prem and public cloud solution options and let users compare the solution and its pricing and decide on their cloud deployment model.
Whats New?
There are three major highlights to Sizer 6.0 which completely redefines the sizing as it is done today.
1. Cluster templates and libraries:
- Expert library of profiles based on best practices
- User created profiles based on customer or deployment preferences
2. Multi cloud approach to solutions
- Enabling workloads for on-prem, bare metal public cloud or a combination(hybrid)
- Compare budgets for different solutions
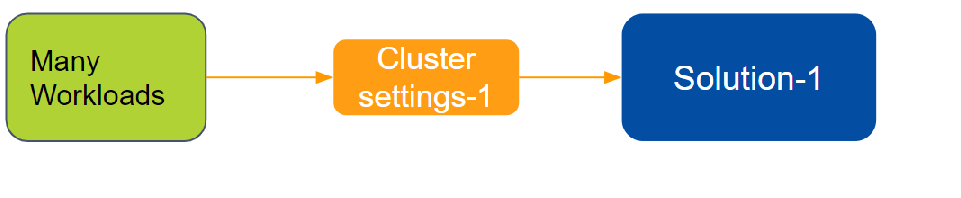
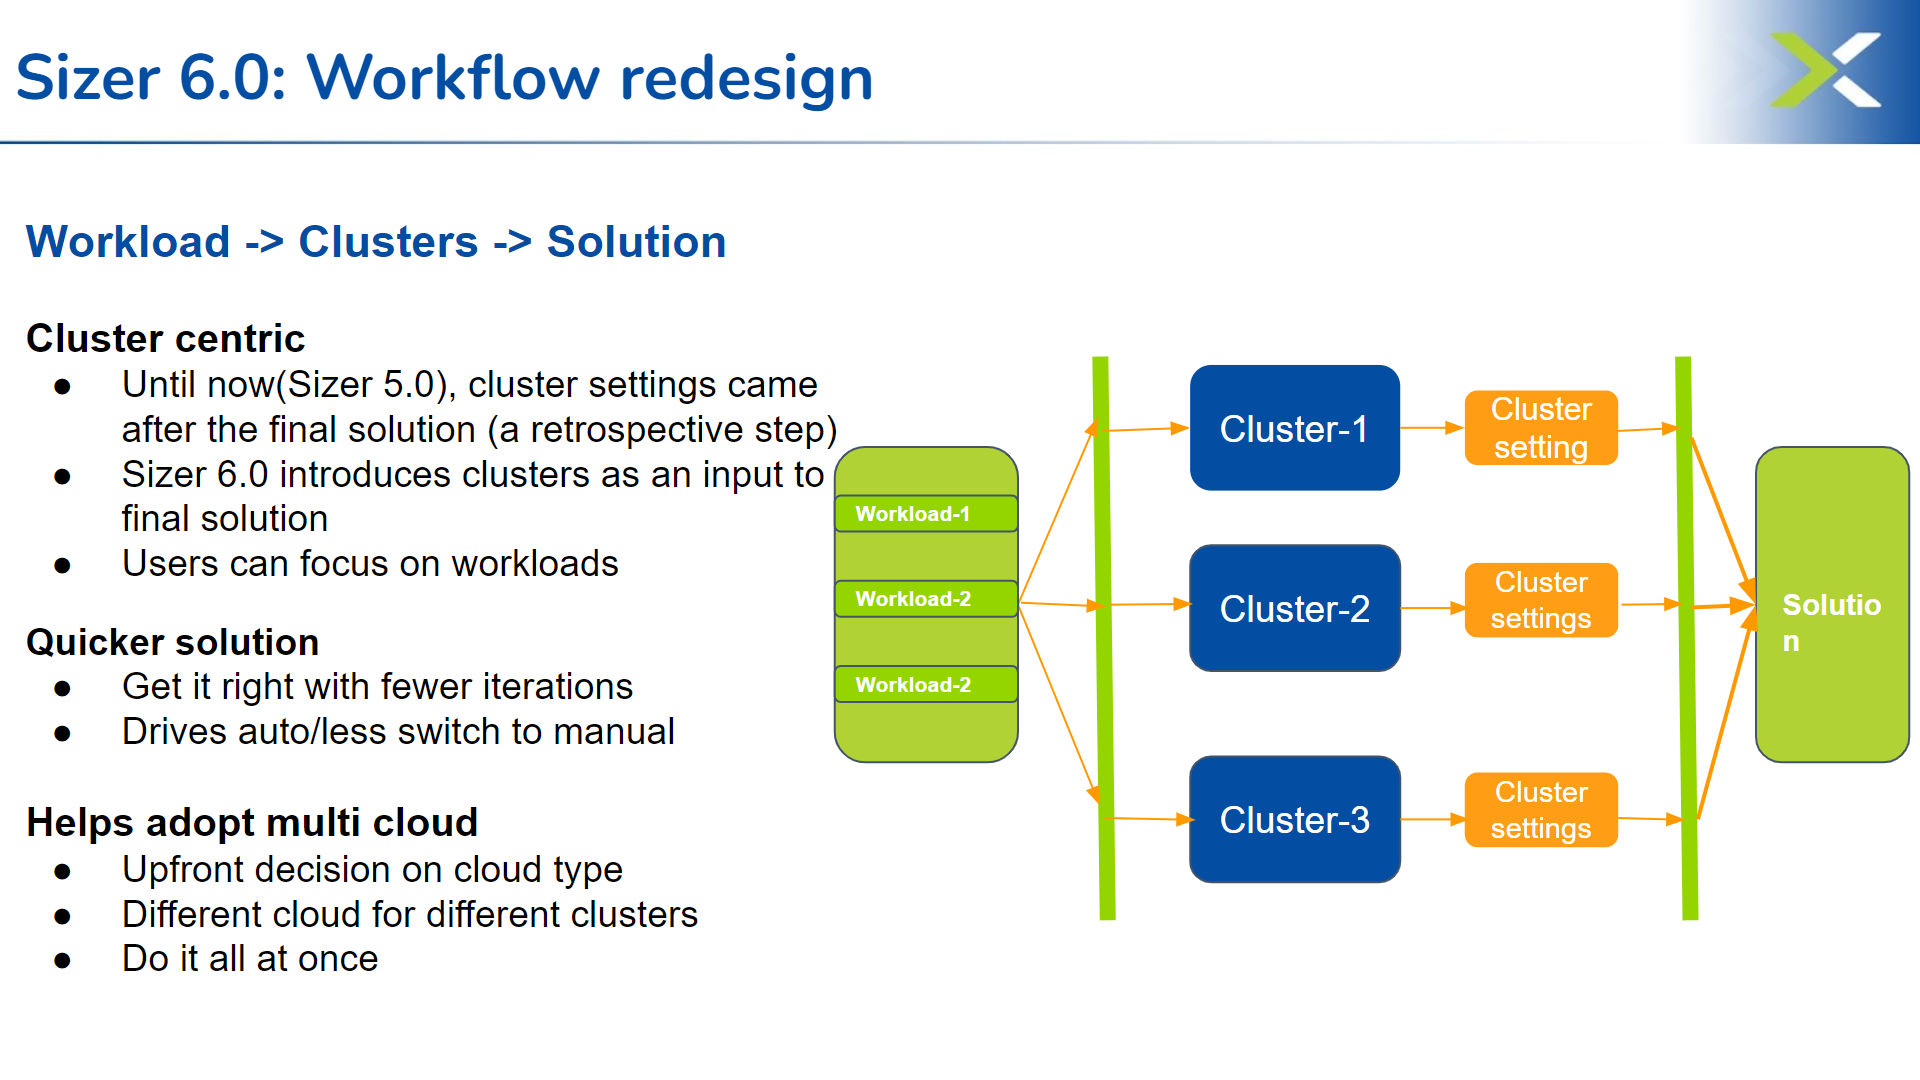
3. Workflow redesigned (focused on cluster)
- Workload -> Clusters -> Solution
Sizer 6.0 features : Deep dive
1. Cluster templates and Expert libraries:
What is a cluster templates?
Sizer 6.0 has come up with a concept of cluster profiles. These are specific cluster settings for a sizing. The cluster profile is user-defined and users can create as many profiles as needed by giving the profiles a unique name.
How does creating a cluster template help ?
Different types of workloads have different preferences for the recommended solution. For example – a Database cluster would be quite different from a VDI cluster. Whereas a DB cluster would almost always be All Flash or for some SEs even prefer All NVMe nodes, a hybrid node for VDI cluster would be sufficient in most cases. These are different options in the cluster settings that can be set for the given workload by the users.
Another example is preferred set of models. Some customers would like to go with certain models (already existing in their environment) or filter out certain models (for ex: 1065 as it is single SSD).
Currently, SEs change these filters and preferred options in the cluster settings page every time for a new scenario/sizing.
With Sizer 6.0, Nutanix SEs and partners can save these settings (as a cluster template) and use it for future sizings.
For example: There are certain settings a user typically prefer for Oracle
1. Nodes have to be All Flash (or NVMe)
2. Should be a hot processor (>3.0GHz)
3. Only certain models (NX-8050 , NX-8070)
SEs can save an Oracle cluster profile with these settings and import this profile every time they size for an Oracle workload. This helps avoid repeating the settings every time making the sizing process faster and consistent.
Power of Cluster template/Expert Library:
Leveraging Nutanix expertise:
Why care?
-
Focus on the Workloads with the customer and then let your preferred cluster settings control Auto sizing and yield strong solution
- Can get more consistency across wide range of Sizer users
- You don’t have to know all 18 vendors in Sizer (focus on workloads and software and less on HW)
- Can easily compare multiple vendors
Brings uniformity to solutioning
- Across different user persona(expert, moderate, beginner)
- Across internal SEs and partners
- Removes the need to be Nutanix technology expert or expert of the workload being sized(eg Database)
How do I create a cluster template?
There are two ways to create a user-defined cluster profile in Sizer.
- Directly creating cluster profile from user preferences
- Saving an existing cluster setting as profile while doing a sizing
Steps for creating user defined templates:
- Directly creating template from user preferences
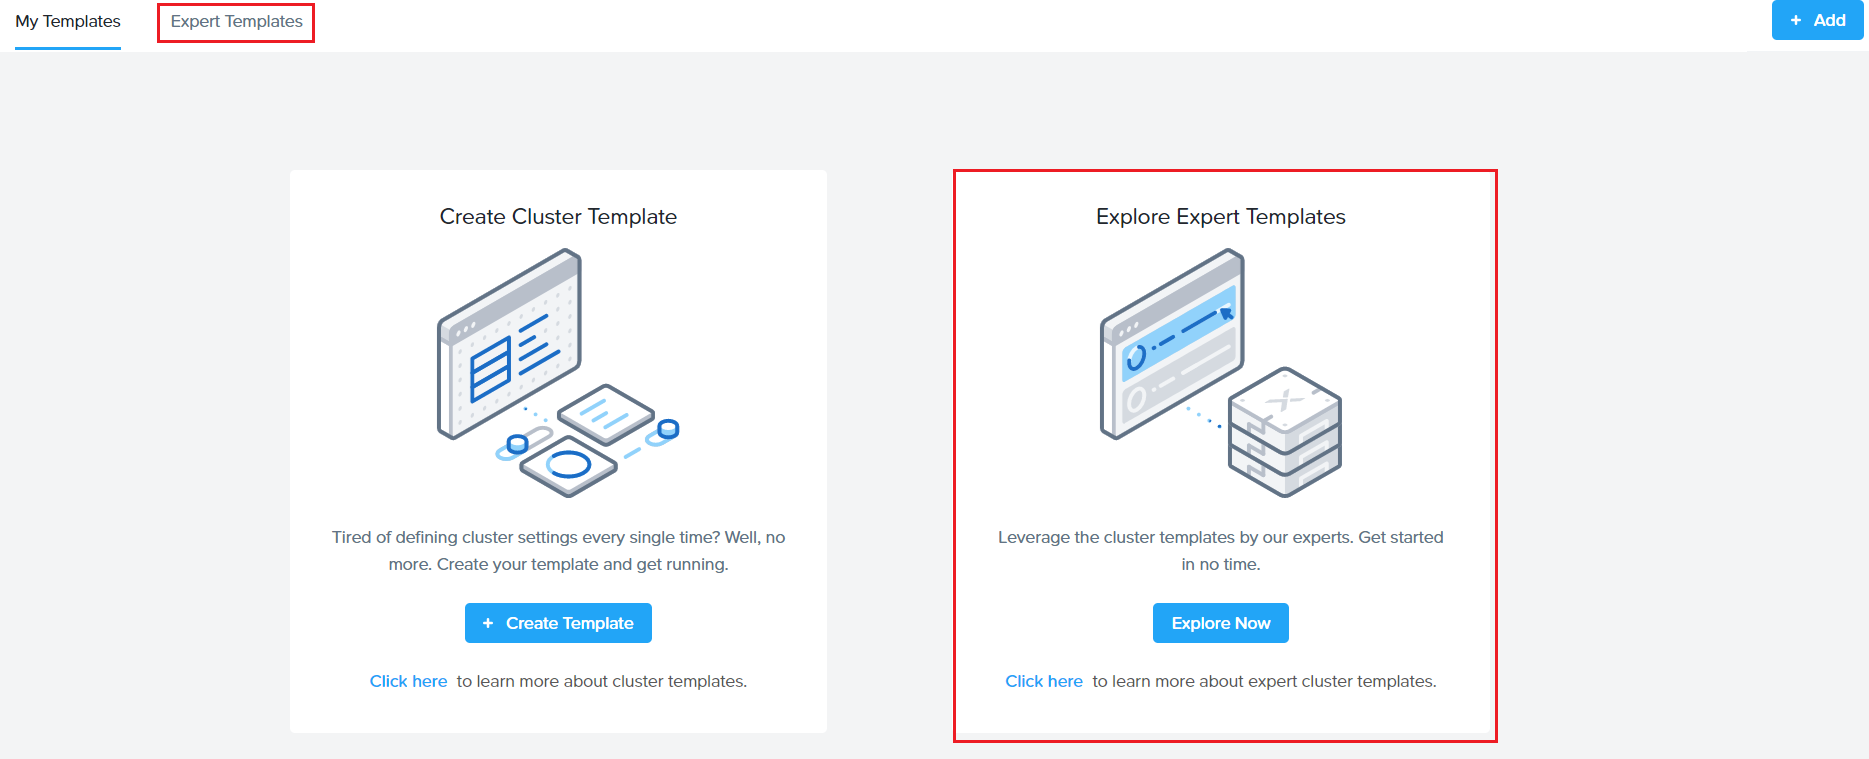
Go to the User icon on the top right corner and click cluster template (pic 1)

Under ‘My Templates’ , click on ‘Create Template’
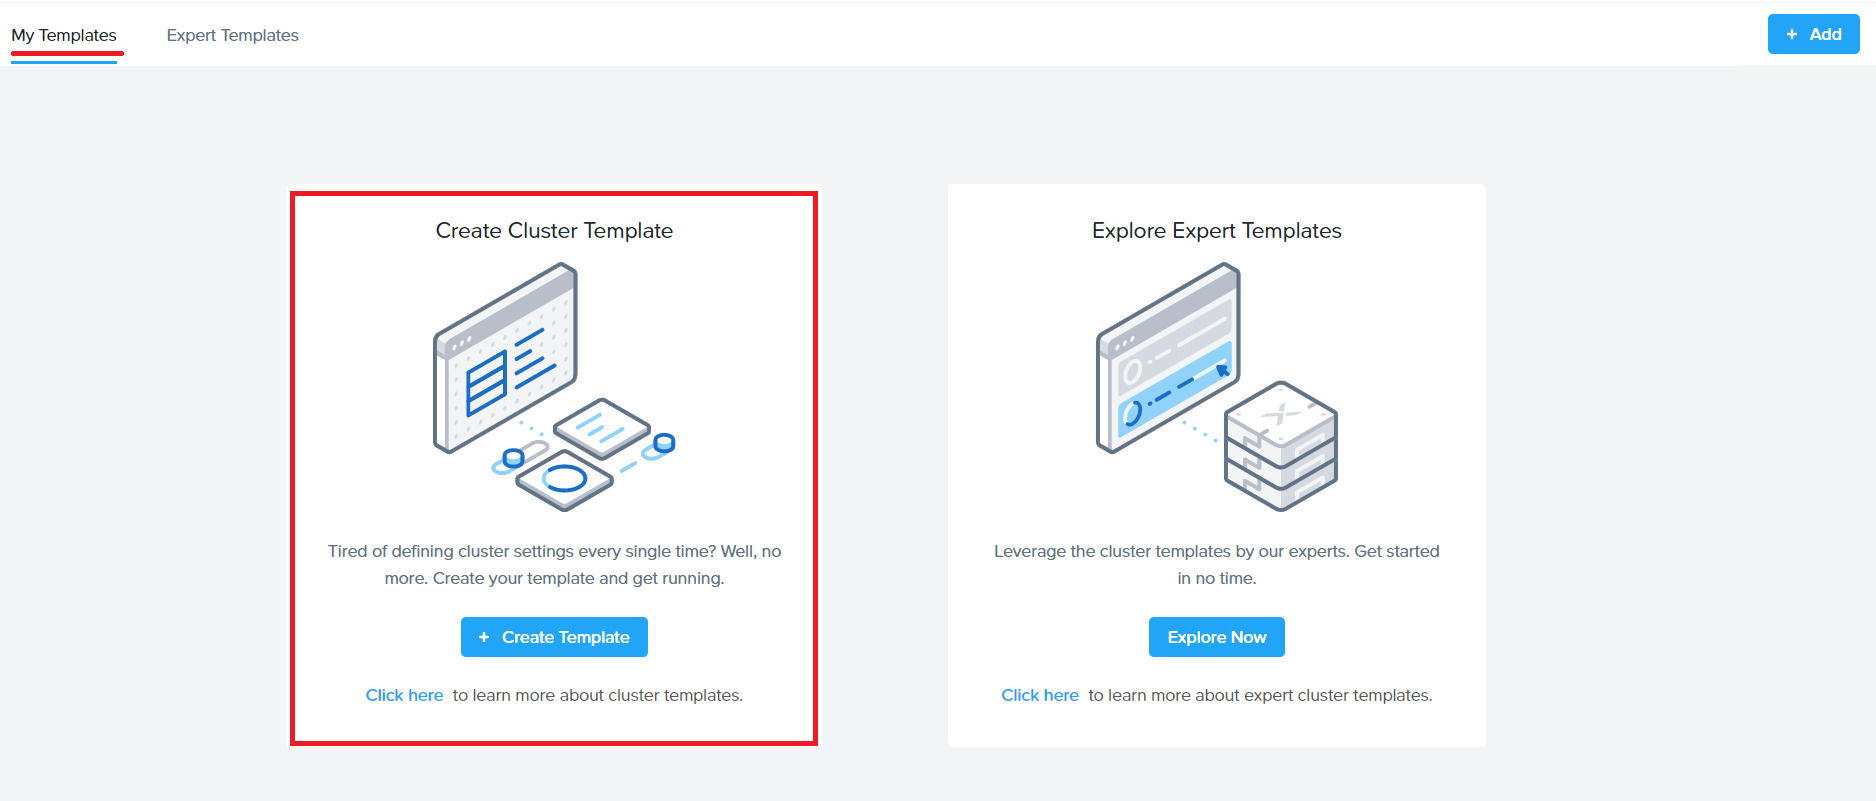
Click on Create in the next screen (shown below)

Next, on the cluster settings screen, enter a name for the profile (eg Database cluster template) and select settings (certain CPUs, CVM allocations, preferred platforms and many more attributes shown in next section)
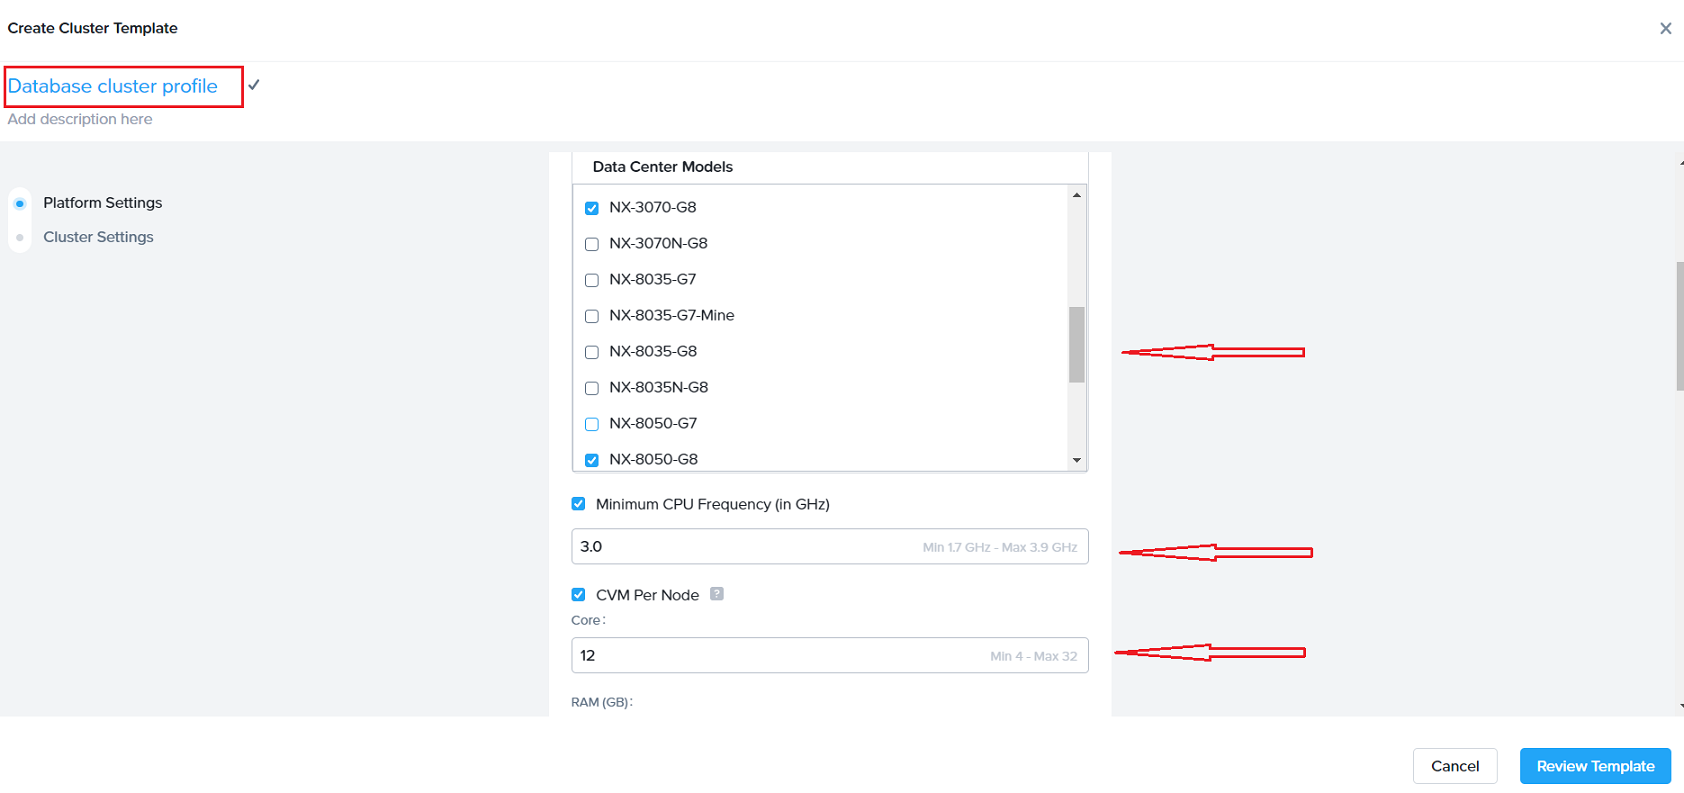
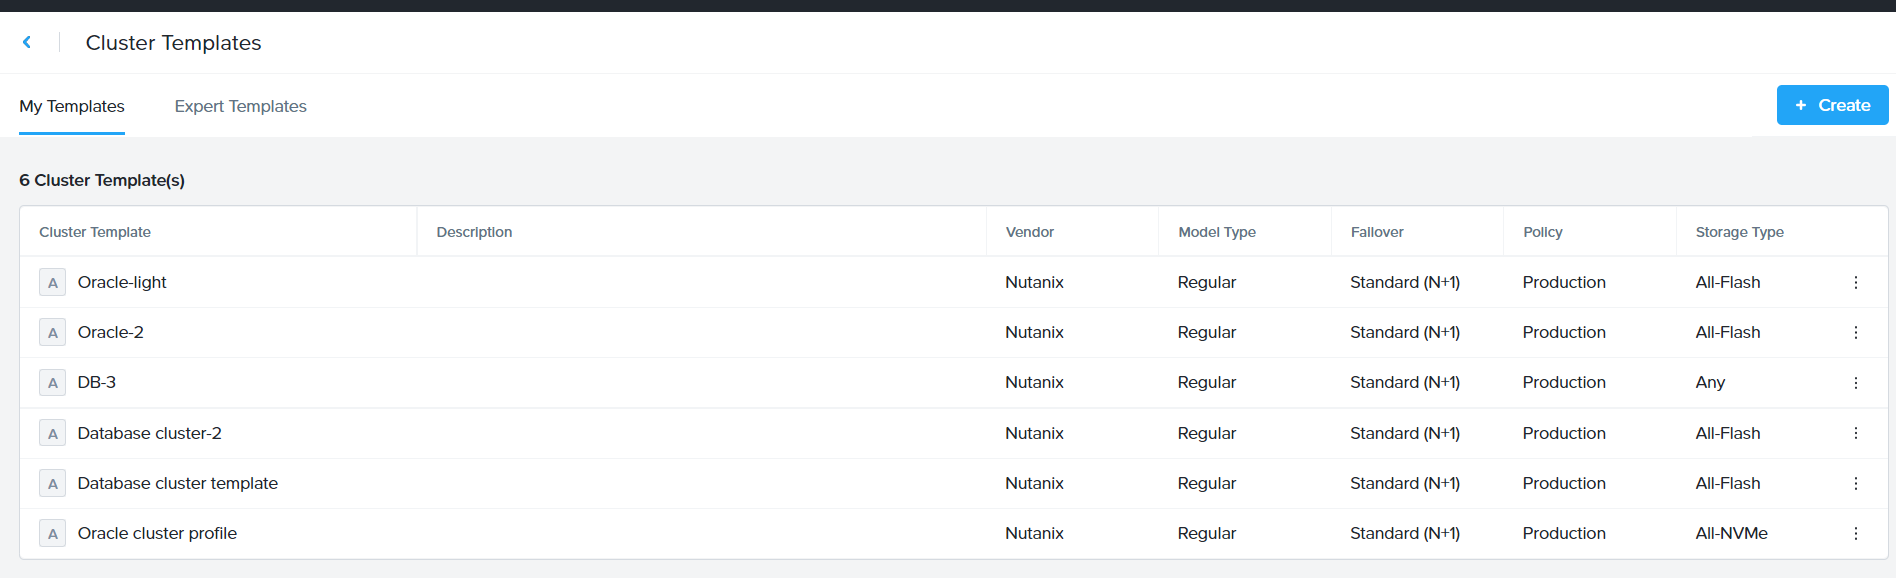
Click “Review” and then “Save” the profile which starts showing in the Cluster template dashboard (shown below)
- Save Template while creating the scenario
To provide flexibility and for users to be ‘in context’ while creating/saving a template, additionally, an option in Sizer is to save a particular cluster setting done for a current sizing/opportunity as a template for applying in future for a similar opportunity or workload type.

This is provided as an option “Save Template” in the cluster settings page. It saves the current settings in the page (user needed to provide a name for the template) as shown:
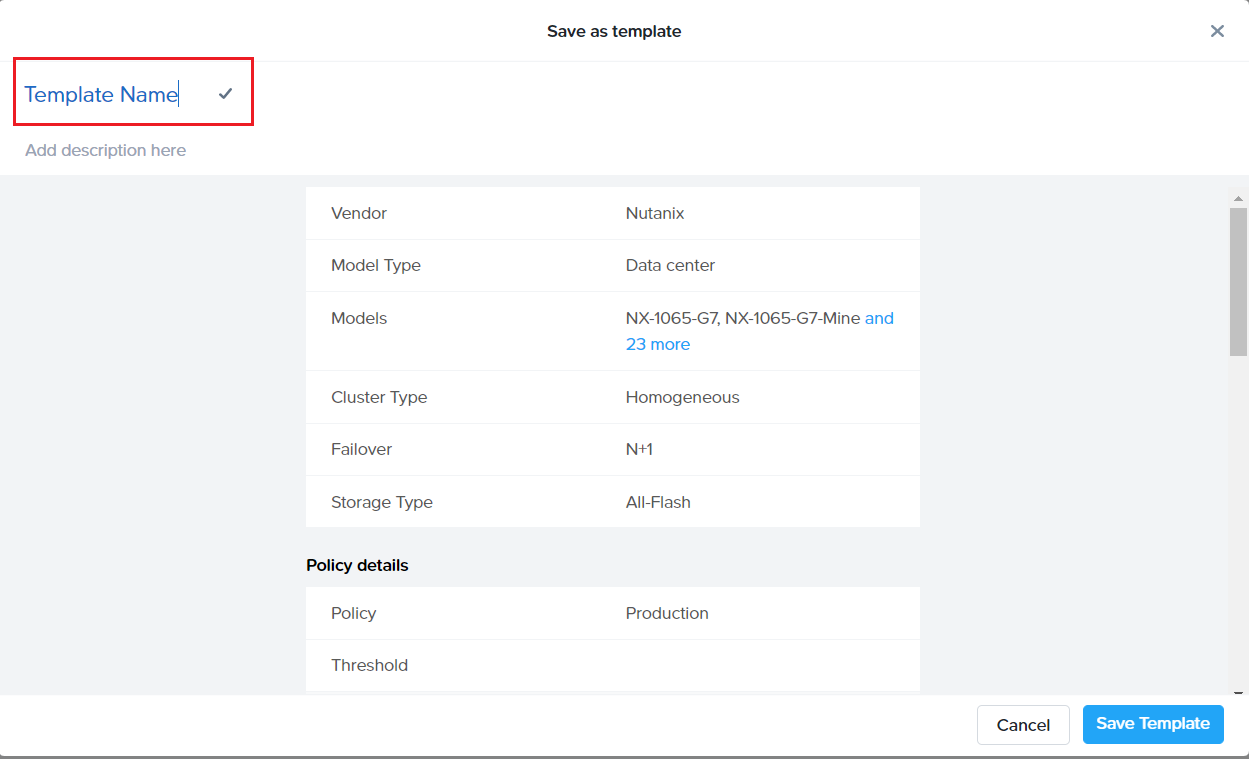
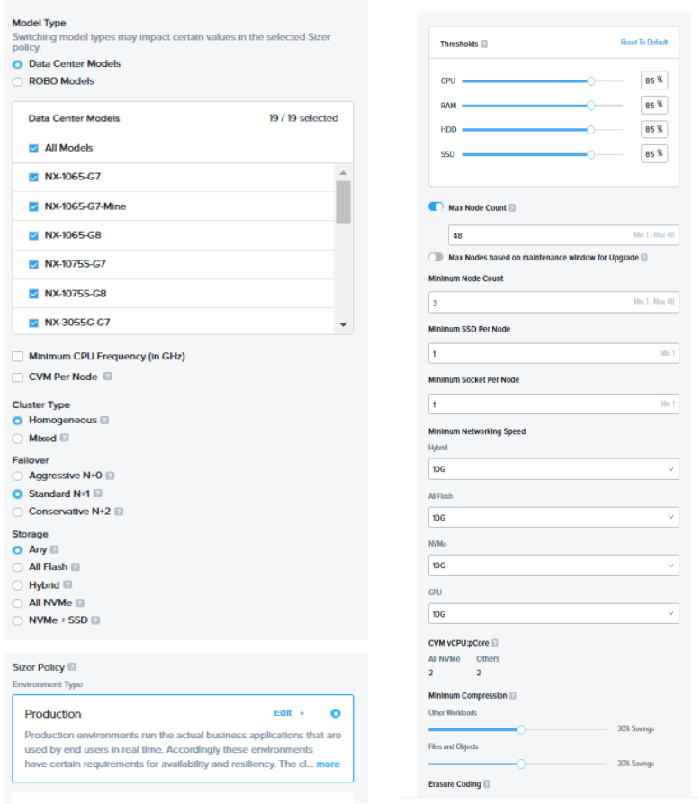
Cluster profile attributes:
Below is the list of attributes and filters which can be set for the cluster profiles based on the requirement of the cluster/customer.
| Cluster Profile attributes | sample values |
| Data Center models / Robo Models | NX 1065-G8/1075S/3060… |
| Minimum CPU Freq(in GHz) | 1.7 |
| CVM per Node | |
| Cores(physical) | 4 |
| RAM | 28 |
| Cluster type | Homogeneous |
| Failover | Standard(N+1) |
| Storage | Any |
| Sizer Policy | Production |
| Threshold % | |
| CPU | 85% |
| RAM | 85% |
| SSD | 85% |
| HDD | 85% |
| Minimum Networking speed | 10G |
| Minimum SSD per node | 1 |
| Minimum socket per node | 1 |
| CVM : vCPU:pcore | 2 |
| Compression % (default) | 30% |
| ECX | OFF |
Cluster settings UI in Sizer:
What is an Expert Library ?
Expert library is exactly same as the cluster profiles except that instead of the users defining the cluster profiles themselves, these profiles are created by experts in their respective areas.
The Expert library of cluster profiles is listed by workloads. For ex: Database experts know best what an Oracle cluster should look like and apply the settings accordingly. Similarly, there are libraries for VDI, Files , General purpose Server Virtualisation etc.
SEs and partners would just need to apply these libraries during creating a sizing for the respective workload/s from the cluster settings page (explained in detail in next section).
Expert Library is a separate tab next to the user defined cluster profile in Sizer.
How to use Cluster profiles/Expert libraries ?
While creating a sizing, on the cluster settings page, click on ‘Apply cluster template’ which pops up the list of user defined profiles and expert libraries. SEs can select any and have a quick view of the set attributes and hit apply. This will automatically select values in the cluster settings screen for the scenario which is being sized.
Similarly, as shown in the below image, using the Save template button, a new Profile can be saved from the cluster settings page of a scenario being sized. This becomes handy for leveraging the work done in manually setting the filters for current sizing for future reference for a new sizing.
For example: If an SE is sizing for a customer BestBuy which prefers certain NX models , SE would need to select only those models in platform list in the Cluster settings page for the given scenario. At the same time, they can save this as a template (say naming it as BestBuy template) and can apply every time when sizing for BestBuy opportunity.

List/View/Apply Cluster template while creating a sizing:

2. Multi cloud solutions:
The world is moving to a hybrid multi-cloud era where customers would be able to choose between different cloud options based on the requirements and data privacy or regulatory needs. There may be specific applications or chunks of data that would need to sit on-prem and other applications that could embrace public cloud.
Sizer 6.0 is designed to support this hybrid multi cloud solutions. Prior to 6.0, sizer could either recommend a on-prem HCI solution or on cloud (Clusters on AWS). So the deployments had to be either/or in terms of opting between private cloud/HCI or going public with Clusters on AWS/Azure.
Multi cloud use cases supported in Sizer:
There are several use cases for multi cloud which is supported by Sizer.
For example:
-
Primary workload on on-prem HCI , DR for the same on Clusters on AWS
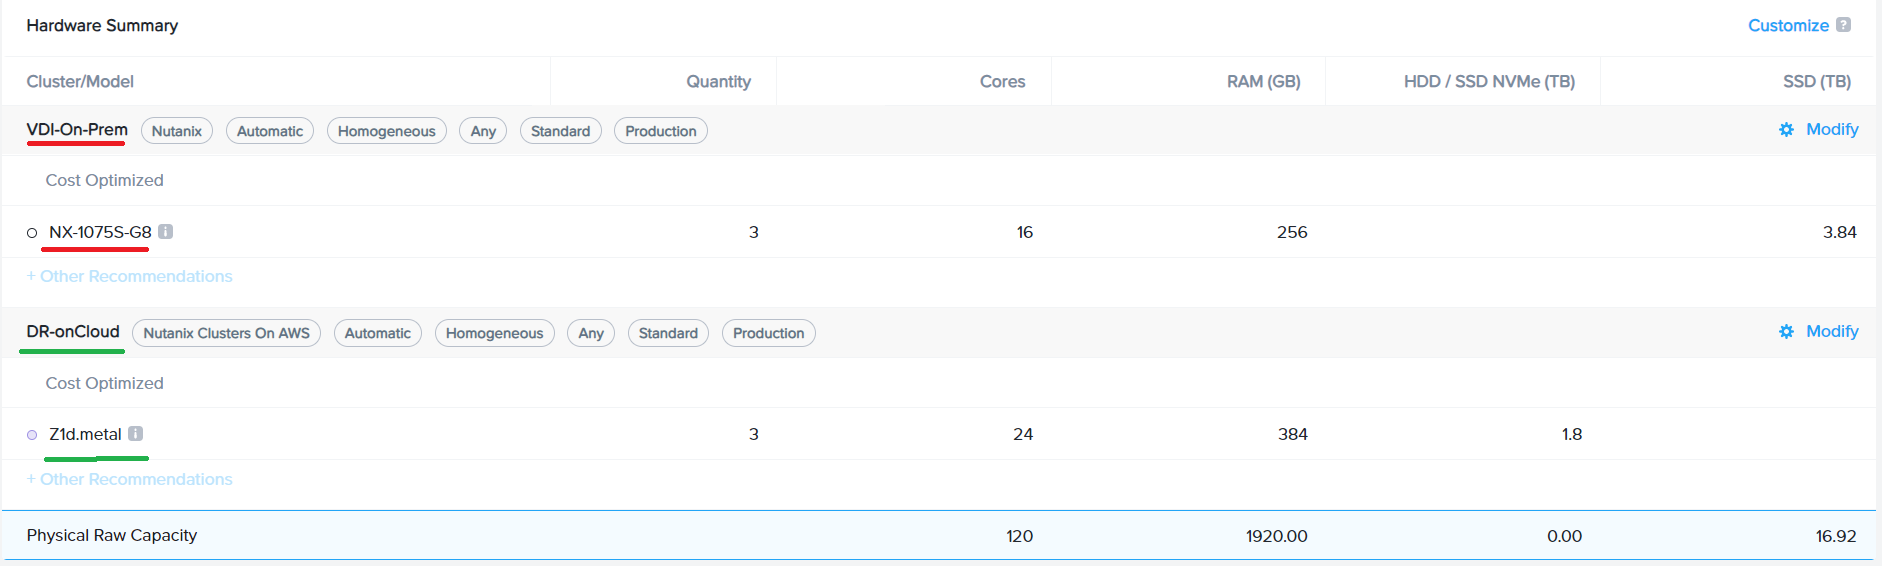
As you can see from the image below, with Sizer 6.0, we can build a on-prem HCI (on NX ) for primary VDI cluster and a DR setup for this cluster on public cloud(Clusters on AWS), all in the same solution/scenario.
How does supporting multi cloud in Sizer help?
As seen from the above example, the ability to choose different cloud vendor (and even different HW vendor for HCI) brings flexibility in creating the right solution. With prior versions, Sizer would force one solution/cloud for both the clusters, the primary VDI and the DR. So either both VDI and DR clusters would be on on-prem NX or both have to be on public cloud.
However, since DR is emerging as a good initial se case for Clusters on public cloud, while the primary workload still needs to be on-prem for various reasons, it only makes it imperative for the solutioning tools to be able to come up with a multi cloud approach recommending the right cloud for the workload in context.
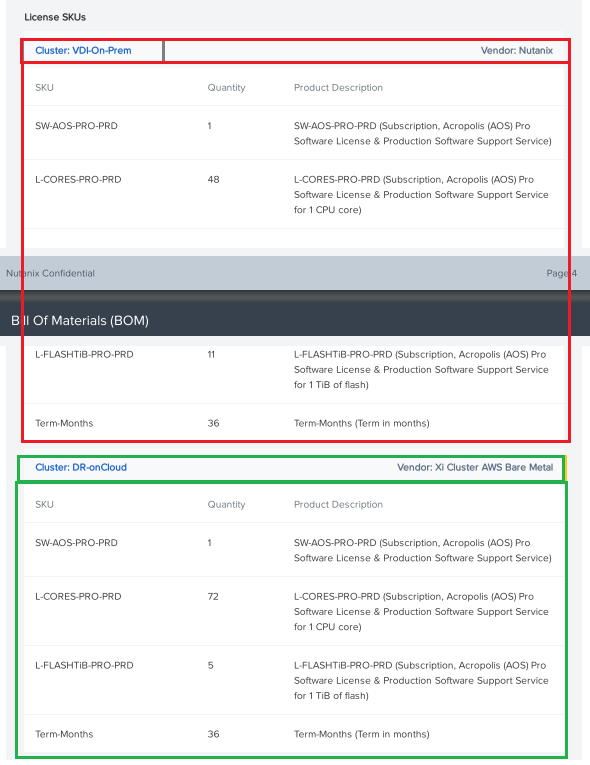
BOM and Budgetary quoting for Multi Cloud
Prior to Sizer 6.0, even when the scenario had more than 1 cluster (multi cluster with same HW vendor), the licenses in the BOM and the SKUs and pricing in the Budgetary quote were aggregated across all clusters.
With 6.0, one big change is that the licenses for SW and the HW BOM and the $$ value are split and broken up by Cluster.
This is particularly helpful in the Multi cloud era as it gives insights into the individual cluster’s cost. While deciding between a mix of on-prem and public cloud options , having the visibility of the costs by cluster for a multi cluster solution would help in estimating the budget and also help in making the decision on the various cloud options
In the image below, there are two clusters:
The primary workload VDI in on-prem on NX and the DR is on public cloud(NC2 on AWS).
Both are listed separately in the BOM and Budgetary quote to give an insight into the license requirement and $$ value for on-prem and cloud deployment.
Multi cluster quoting is also supported for Budgetary quote giving the split of the $$ across the on-prem and cloud.

Each cluster can be expanded to get the break-up across SW/HW as shown below:
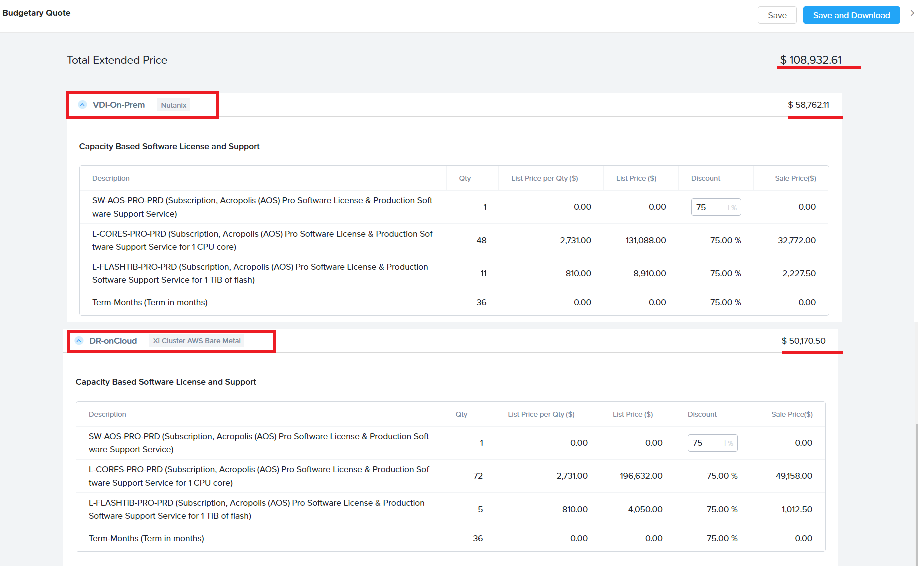
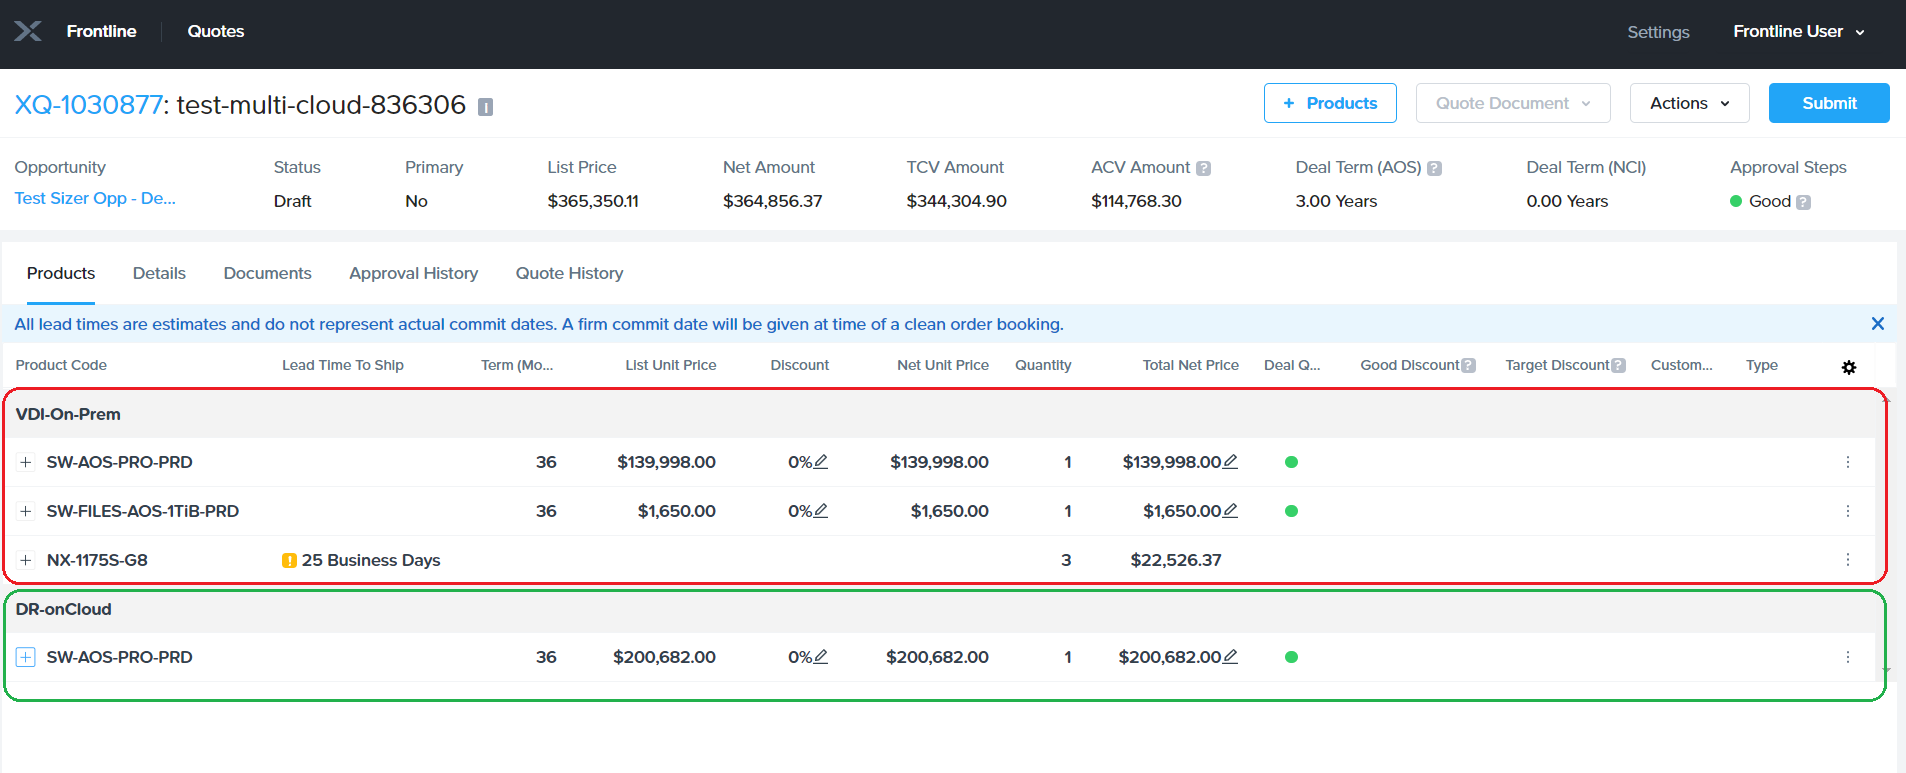
The frontline quote also can be seen split by Clusters as shown:
3. Workflow redesigned (focused on cluster)
Sizer 6.0 brings back focus on cluster settings. Until now, users provided the workload inputs and sizer used to pick the solution based on default cluster settings. However, there are many preferences/filters are available to tweak the clusters to a desired solution. Those were still possible with Sizer 5.0 but as a back step on clicking modify after the default solution was recommended by sizer. This led users to directly switch to manual mode instead and miss out on the precise auto recommendation. The new release will take into account the users desired preference for cluster (ex: certain set of cpus or node types or thresholds etc) for recommending the default solution, thereby reducing the steps including the need to switch to manual mode and bring the solution closer to their desired preference in one go.
The new flow thus becomes:
Workload inputs -> Clusters settings -> Solutions
The “Save and Review” button on the workload input screen is a mandatory flow which takes to the cluster settings page. Users can choose the vendor as well as any other preference for the cluster before hitting next for the desired solution.
Another benefit of this flow is that users can readily use the templates (newly introduced concept as explained in section 1 above) . Clicking the apply templates will pop-up the option of importing their own or expert cluster template for this sizing during/in the sizing process.

Note that Sizer will mandate reviewing the cluster settings (bring cluster settings UI in the flow) only when the cluster is being created the first time. When adding more workloads to an existing cluster, this step is skipped as user would have already set the preferences during creating the cluster initially. They can always edit any of the preferences as many times as desired by going to the cluster settings UI upon clicking “modify” button from the solution screen.