Collector 4.3

Nutanix Collector 4.3 is now available for download.  

WHAT’S NEW

  • Support CLI for Collector Windows – You can run Nutanix Collector in the CLI mode on the Windows operating system to initialize data collection from Prism, vCenter, Hyper-V (remote and local), and ONTAP CIFS shares.
  • For v-Center – Collection output includes a new sheet named Datastore that allows you to look at the individual datastore, associated hosts, VMs, and their properties.

RESOLVED ISSUES

  • For vCenter environments, the data collection fails when Collector encounters nested datacenters hierarchy while scanning a list of available clusters.
  • Removed the domain administrator check for single node Hyper-V local cluster collection. Note:  For Hyper-V (remote) cluster with multiple hosts, you must be the domain administrator and for Hyper-V (remote) cluster with a single node, you must be the local administrator.
  • In certain scenarios, collection fails when gathering the VM performance data of a Hyper-V cluster.
  • Collector identifies a Hyper-V cluster as a single node when running on 64-bit Windows operating systems.
  • For ONTAP CIFS share cluster, collection fails when the search path for the CIFS home directory is not configured.

KNOWN ISSUES

  • When you run Collector in the CLI mode on Windows, the CIFS Shares count equal to or greater than 20 is displayed as 21 CIFS Shares.
  • Collector fails to gather the information when there is only one Prism Element cluster under the Prism Central. For the workaround, see the Troubleshooting section of the Collector User Guide.

RESOURCES

CALL TO ACTION

Simplify your requirement gathering by downloading Collector

Public URL: Collector Download Link for Prospects (no login required)

MyNutanix URL: Collector Download Link for MyNutanix Users 

Report issues in Collector via this Google form

Thank you,

Team Nutanix Collector

Accessing Expansion Explorer as a Nutanix Partner

Nutanix Expansion Explorer is a new sales enablement product to help our sales team explore expansion opportunities for our existing accounts. As a partner, access is controlled by the Account Owner.

Step-by-step process to access Nutanix Expansion Explorer

  1. Visit https://expansion-explorer.nutanix.com
  2. Login via MyNutanix credentials
  3. Once you log in, you can view all the leads that have been passed by the respective Account Owners.
  4. For each lead, you can view the Account Owner, Cluster Name, Cluster Details, Recommended Sizing, Potential Deal Size, Nutanix Channel SE, Created date & assigned date.

The description of each column is documented below:

Column Name Description
Lead ID Unique lead ID for the cluster that needs to undergo a full hardware refresh
Account Name Name of the Account that owns this cluster.
Account Owner The Account Owner who is associated with the lead ID. 
Cluster Name Name of the cluster for which the lead is generated.
Cluster Details Provides the node quantities and the hardware model that is part of this cluster.
Recommended Sizing A link to autogenerated Sizer solution based on the cluster workload information gathered via Nutanix Insights. The hyperlink redirects the user to the scenario in Sizer post-authentication.
Create Date The date on which this lead was generated by Expansion Explorer.
Potential Deal Size The total list price of the recommended solution including both the hardware and software is recommended by Sizer.
Channel SE Nutanix channel SE to reach out if you need any help with sizing activities.
Assigned Date The date on which this lead was assigned to the user. 

How to proceed with leads?

  1. Click on the Recommended Sizing to view the details of Sizing
  2. Analyze automatically gathered workloads & solution
  3. Reach out to the customer to validate the requirements
  4. Review the workloads with the customer
  5. Check if the customer plans to run new workloads or decommission any existing workloads
  6. Tweak the requirements based on the discussion with the customer & arrive at the final solution.

If you need any additional information or resources refer here.

Nutanix Validated Design for Unified Storage( NVD NUS)

Nutanix delivers the Unified Storage Design, as a bundled solution for storage consolidation with the SMB, NFS and S3 protocols, that includes hardware, software, and services to accelerate and simplify the deployment and implementation process. This Validated Design features a full-stack solution for unified storage deployments that integrates multiple products including AOS, AHV, Prism Pro, Files, Objects, Flow, F5, Mine, and HYCU.The Unified storage validated design sizer reference scenarios have the following features:


  • The baseline configuration is comprised of two clusters:
    • Nutanix Files – 4-node cluster (representing one Availability Zone) based on NX-8155 for the file servers providing SMB and NFS services.   
    • Nutanix Objects – 4-node clusters (representing one Availability Zone) based on NX-8155 for the object instances providing S3 services. These clusters can also host Prism Central as a part of the design


The overall Unified Storage Design can optionally include the management and backup cluster as defined in the Hybrid Cloud NVD (On prem (Large)) reference scenario with the following features:

  • Management – 4-node cluster based on NX-1175S for Prism Central, Active Directory, IPAM, Load Balancing, SYSLOG, and any other management services.
  • Backup – 4-node cluster of NX-8155-G8 for Mine/Hycu 

A dedicated management cluster in each Availability Zone provides increased availability, security, operations, and performance. The Files or Objects clusters have a defined maximum size of 8 nodes each, which provides a reasonable maintenance window for rolling firmware and software upgrades and rebuild operations during failure scenarios given the node density and drive sizes. Smaller workload clusters can be deployed, but the maximum size should not exceed 8 nodes.


  • HYCU software license is not included, and must be purchased separately via other channels. 
  • Services SKUs are not included in the Sizer reference scenarios. Review the BOM in the NVD appendix for the complete list of Services SKUs which should be included.


It is extremely important to review the entire Hybrid Cloud: Unified Storage Design on the Solutions Support portal to understand the complete Hybrid Cloud validated solution. 


For questions or additional information:


Nutanix Validated Design: Hybrid cloud NVD AWS-DR (Large)


Nutanix delivers the Disaster Recovery to Nutanix Cloud Clusters on AWS Design, as a bundled solution for general server virtualization that includes hardware, software, and services to accelerate and simplify the deployment and implementation process. This Validated Design features a full-stack solution for hybrid cloud deployments that integrates multiple products including AOS, AHV, Prism Pro, Calm, Flow, Leap, Mine, and HYCU.The Validated Design – Disaster Recovery to Nutanix Cloud Clusters on AWS Design  sizer reference scenarios have the following features:


  • The on-prem  baseline configuration is comprised of three clusters:
    • Management – 4-node cluster based on NX-1175S for Prism Central, Active Directory, IPAM, Load Balancing, SYSLOG, and any other management services.
    • Workload – 4-16 nodes of NX-3170-G8 for general purpose server virtualization workloads.
    • Backup – 4-node cluster of NX-8155-G8 for Mine/Hycu 
  • The AWS  baseline configuration is comprised of three clusters:
    • Management – 4-node cluster based on m5d.metal for Prism Central, Active Directory, any other management services.
    • Workload– 2 * 4-16 nodes of i3en.metal for general purpose server virtualization workloads. At the time of testing Nutanix only supported a 16 node  cluster in AWS.


A dedicated management cluster in each Availability Zone provides increased availability, security, operations, and performance. The workload cluster has a defined maximum size of 16 nodes, which provides a reasonable maintenance window for rolling firmware and software upgrades. Smaller workload clusters can be deployed, but the maximum size should not exceed 16 nodes.


  •  NVD Defines standard VM “t-shirt” sizes for deployment via Calm:


Small Medium Large
1 vCPU 2 vCPU 4 vCPU
8 GB RAM 16 GB RAM 32GB RAM
50GB SSD 100GB SSD 200GB SSD


  • When using the defined VM sizes, the on-prem per-workload cluster maximums are:


  Small VMs Medium VMs Large VMs
Maximum running VMs per on-premises workload cluster building block 1,860 1,380 690
Maximum running VMs per node on-premises 124 92 46
Maximum deployed VMs per workload cluster on AWS 1,350 675 330
Maximum running VMs per node  on AWS Workload Cluster 90 45 22


  • Due to quoting limitations, a single Availability Zone has two sizer scenarios: Management + Workload cluster, and Backup Cluster. Note that the Hycu software license is not included, and must be purchased separately via other channels. 
  • Services SKUs are not included in the Sizer reference scenarios. Review the BOM in the NVD appendix for the complete list of Services SKUs which should be included.


It is extremely important to review the entire Hybrid Cloud: Disaster Recovery to Nutanix Cloud Clusters on AWS Design on the Solutions Support portal to understand the complete Hybrid Cloud validated solution. 


For questions or additional information:


Collector 4.2

Nutanix Collector 4.2 is now available for download. The release is focused on a major re-architecture of the existing code base that shall enable us to add support for new workloads in the future. Below is a summary of the changes. 

WHAT’S NEW

  • 2x to 3x performance improvement in data collection
  • Improved accuracy of storage metrics when gathering data via Prism
    • Gather storage from all Volume Groups irrespective of VG to VM mapping. For example, VGs associated with Nutanix Files are not mapped to VMs. 
  • Improved user experience for troubleshooting customer issues
    • Support to change log level on the fly to gather additional log files
    • Supported log levels – critical, warning, info, debug

RESOLVED ISSUES

  • Resolved issues around major anti-virus vendors flagged us as Malicious
  • VM level storage metrics handle duplicate vPartition data entries
  • Resolved data collection failures in Hyper-V caused due to unsupported delimiters
  • Populated values for the 95th percentile value of the IOPS, the number of read & write operations under vHosts sheet.

Note: With the new architecture, the size of the Collector bundle has been reduced to half.  

RESOURCES

CALL TO ACTION

Simplify your requirement gathering by downloading Collector

Public URL: Collector Download Link for Prospects (no login required)

MyNutanix URL: Collector Download Link for MyNutanix Users 

Report issues in Collector via this Google form

Thank you,

Team Nutanix Collector

Nutanix Expansion Explorer 1.0

Nutanix Expansion Explorer 1.0

Background

In the early days, Nutanix was dealing with both hardware and software sales. Nutanix sold hardware nodes along with the Life Of Device (LOD) software license before transitioning into software and subscription billing. Nutanix started the transition to the software journey back in 2017. Before the journey began, Nutanix had already sold more than 100K nodes. All these nodes we sold along with the LOD software license. The majority of the hardware sold pre-2018 were NX-G5/G6 boxes, roughly 120K+, and most of the NX-G5 & G6 nodes are already past the End of Maintenance (EOM) dates. These nodes will be reaching the End of Support Life in the next few months and all support for the product will cease unless entitled to an active extended support contract, which can be quite expensive. 

This means there is a great opportunity to refresh a vast number of nodes with aging hardware without support. At the same time, the customers have to migrate from LOD to subscription-based licensing, Capacity Based License (CBL). While this is a great opportunity to refresh the hardware and migrate the software license, it is a herculean task for the sales teams to identify these opportunities at the right time. Expansion Explorer 1.0 aims to solve this problem and guide our Nutanix Sales team & Partners to go after these opportunities. 

Product Benefits 

There is more than one persona for Expansion Explorer, the initial launch is limited to Nutanix users & select Partners. Within Nutanix, we have multiple personas – Account Owner, Customer Success Representative, and Systems Engineer. The Systems SEs within Nutanix can be an SE working on the solution or a channel SE guiding the Partner SE. 

For the Account Owner, Expansion Explorer gives access to high-quality sales leads and the associated potential ACV for existing accounts so that the Account Owners can quickly retire their quota.

For the Systems Engineer, Expansion Explorer automatically gathers precise workload requirements for Pulse-enabled clusters and provides a prebuilt Sizer-recommended solution as starting point to simplify the sizing exercise. 

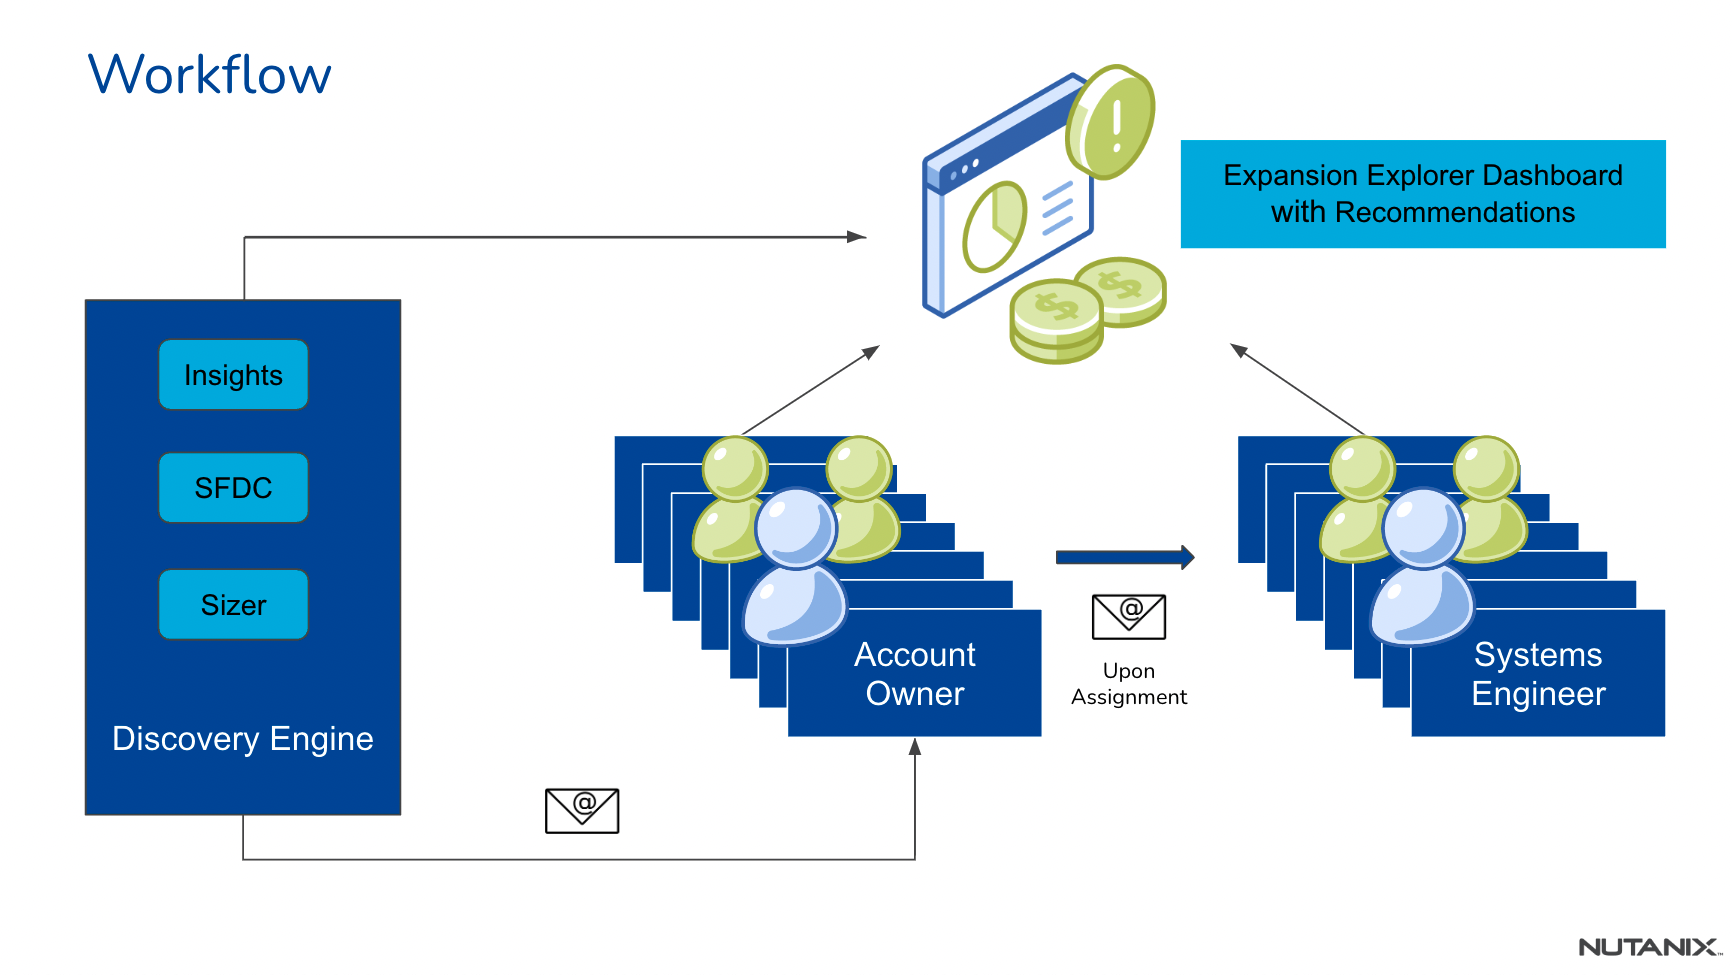
Nutanix Expansion Explorer Workflow 

Expansion Explorer Discovery Engine periodically scans for all the clusters that are calling back home via Pulse. In version 1.0, Expansion Explorer identifies all clusters containing NX nodes that are EOM and need tech refresh. These clusters are then mapped to the respective account owners, CSR, and SE by looking up the data in SFDC. For each cluster that needs a hardware refresh, we gather the workloads being run on them and feed the workload information to Sizer. Sizer comes up with a recommended hardware solution to run these workloads on the latest NX hardware along with the subscription-based Portfolio 2.0 licenses. 

Expansion Explorer identifies leads on behalf of the Account Owner and comes up with a Sizer-recommended solution for the Systems Engineer. All the leads that belong to the given Account Owner are then pushed to the respective Account Owner, CSR, and SE’s Dashboard. The Account Owner would also be notified via email digest about all the leads at the end of the periodic scan. 
Account Owner Dashboard

The Account Owner is the gatekeeper of the leads generated by the Expansion Explorer. The Account Owner can look at the following details of each lead:

Column Name Description
Lead ID Unique lead ID for the cluster that needs to undergo a full hardware refresh
Account Name Name of the Account that owns this cluster, the hyperlink redirects the user to the SDFC Account post-authentication. 
Cluster Name Name of the cluster for which the lead is generated, the hyperlink redirects the user to the cluster within Nutanix Insights post-authentication. 
Cluster Details Provides the node quantities and the hardware model that is part of this cluster.
Recommended Sizing A link to autogenerated Sizer solution based on the cluster workload information gathered via Nutanix Insights. The hyperlink redirects the user to the scenario in Sizer post-authentication.
Create Date The date on which this lead was generated by Expansion Explorer.
Potential Deal Size The total list price of the recommended solution including both the hardware and software is recommended by Sizer.

The Account Owner’s dashboard contains two tabs – Open and Accepted.

Open Leads

Any new lead generated by the Expansion Explorer lands in the “Open” tab. 
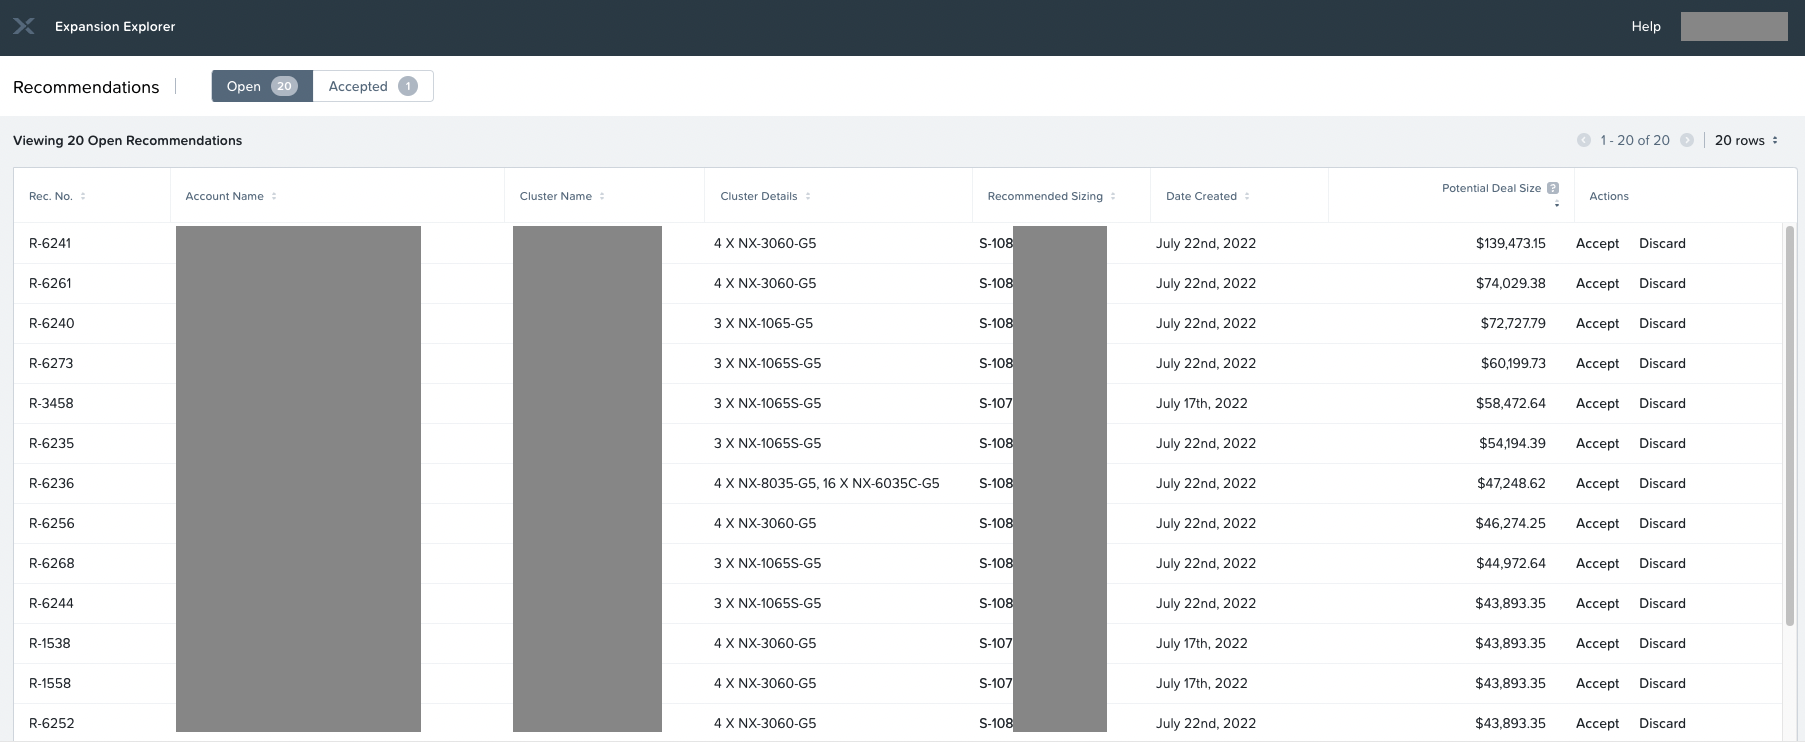
The Account Owner can either “Accept” or “Discard” the lead. 

Accepting Leads & pursuing them Directly

The Account Owner can accept a lead by clicking “Accept”. The below dialog is presented to the Account Owner on clicking “Accept”. The Account Owner can then go ahead and assign the recommendation to either Nutanix Systems Engineer and hand it over to a Partner to take it forward.
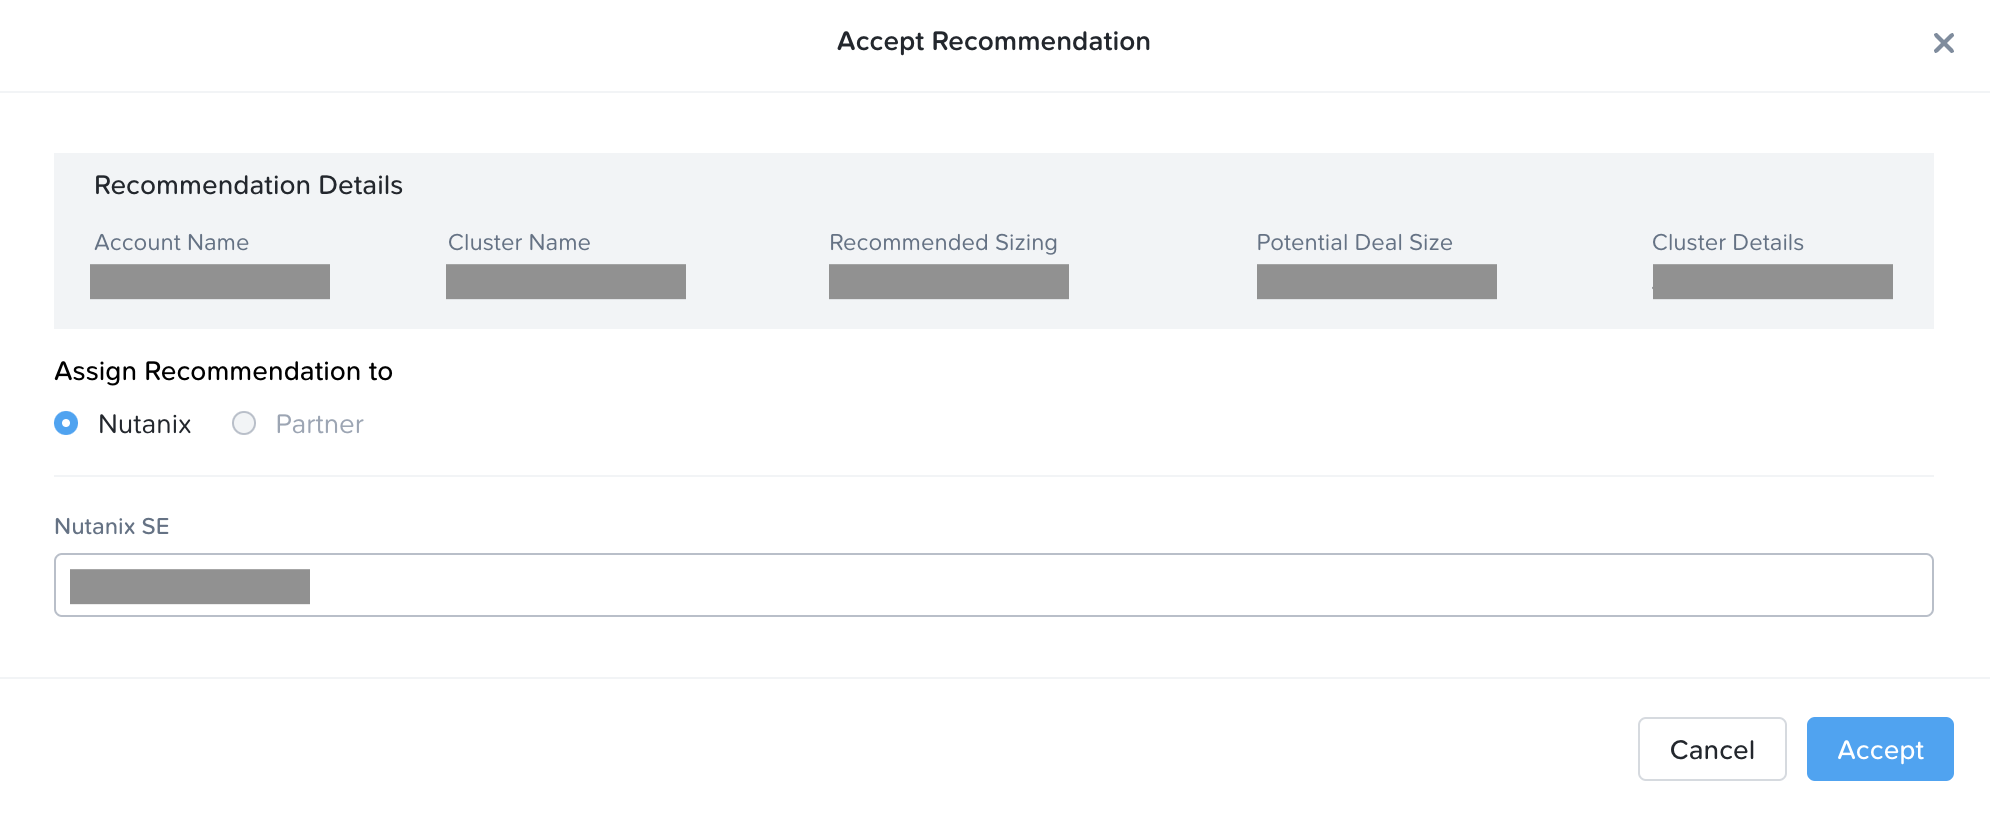
The above screenshot demonstrates assigning the lead to a Nutanix SE. The Account Owner just has to type in the first few characters of the SE name to search, select the SE and then click Accept button.  

Upon accepting and assigning, the lead moves from the “Open” tab to the “Accepted” tab. At the same time, the assignee of the lead would receive an email. Below is a sample email on assigning the lead to Nutanix SE. 
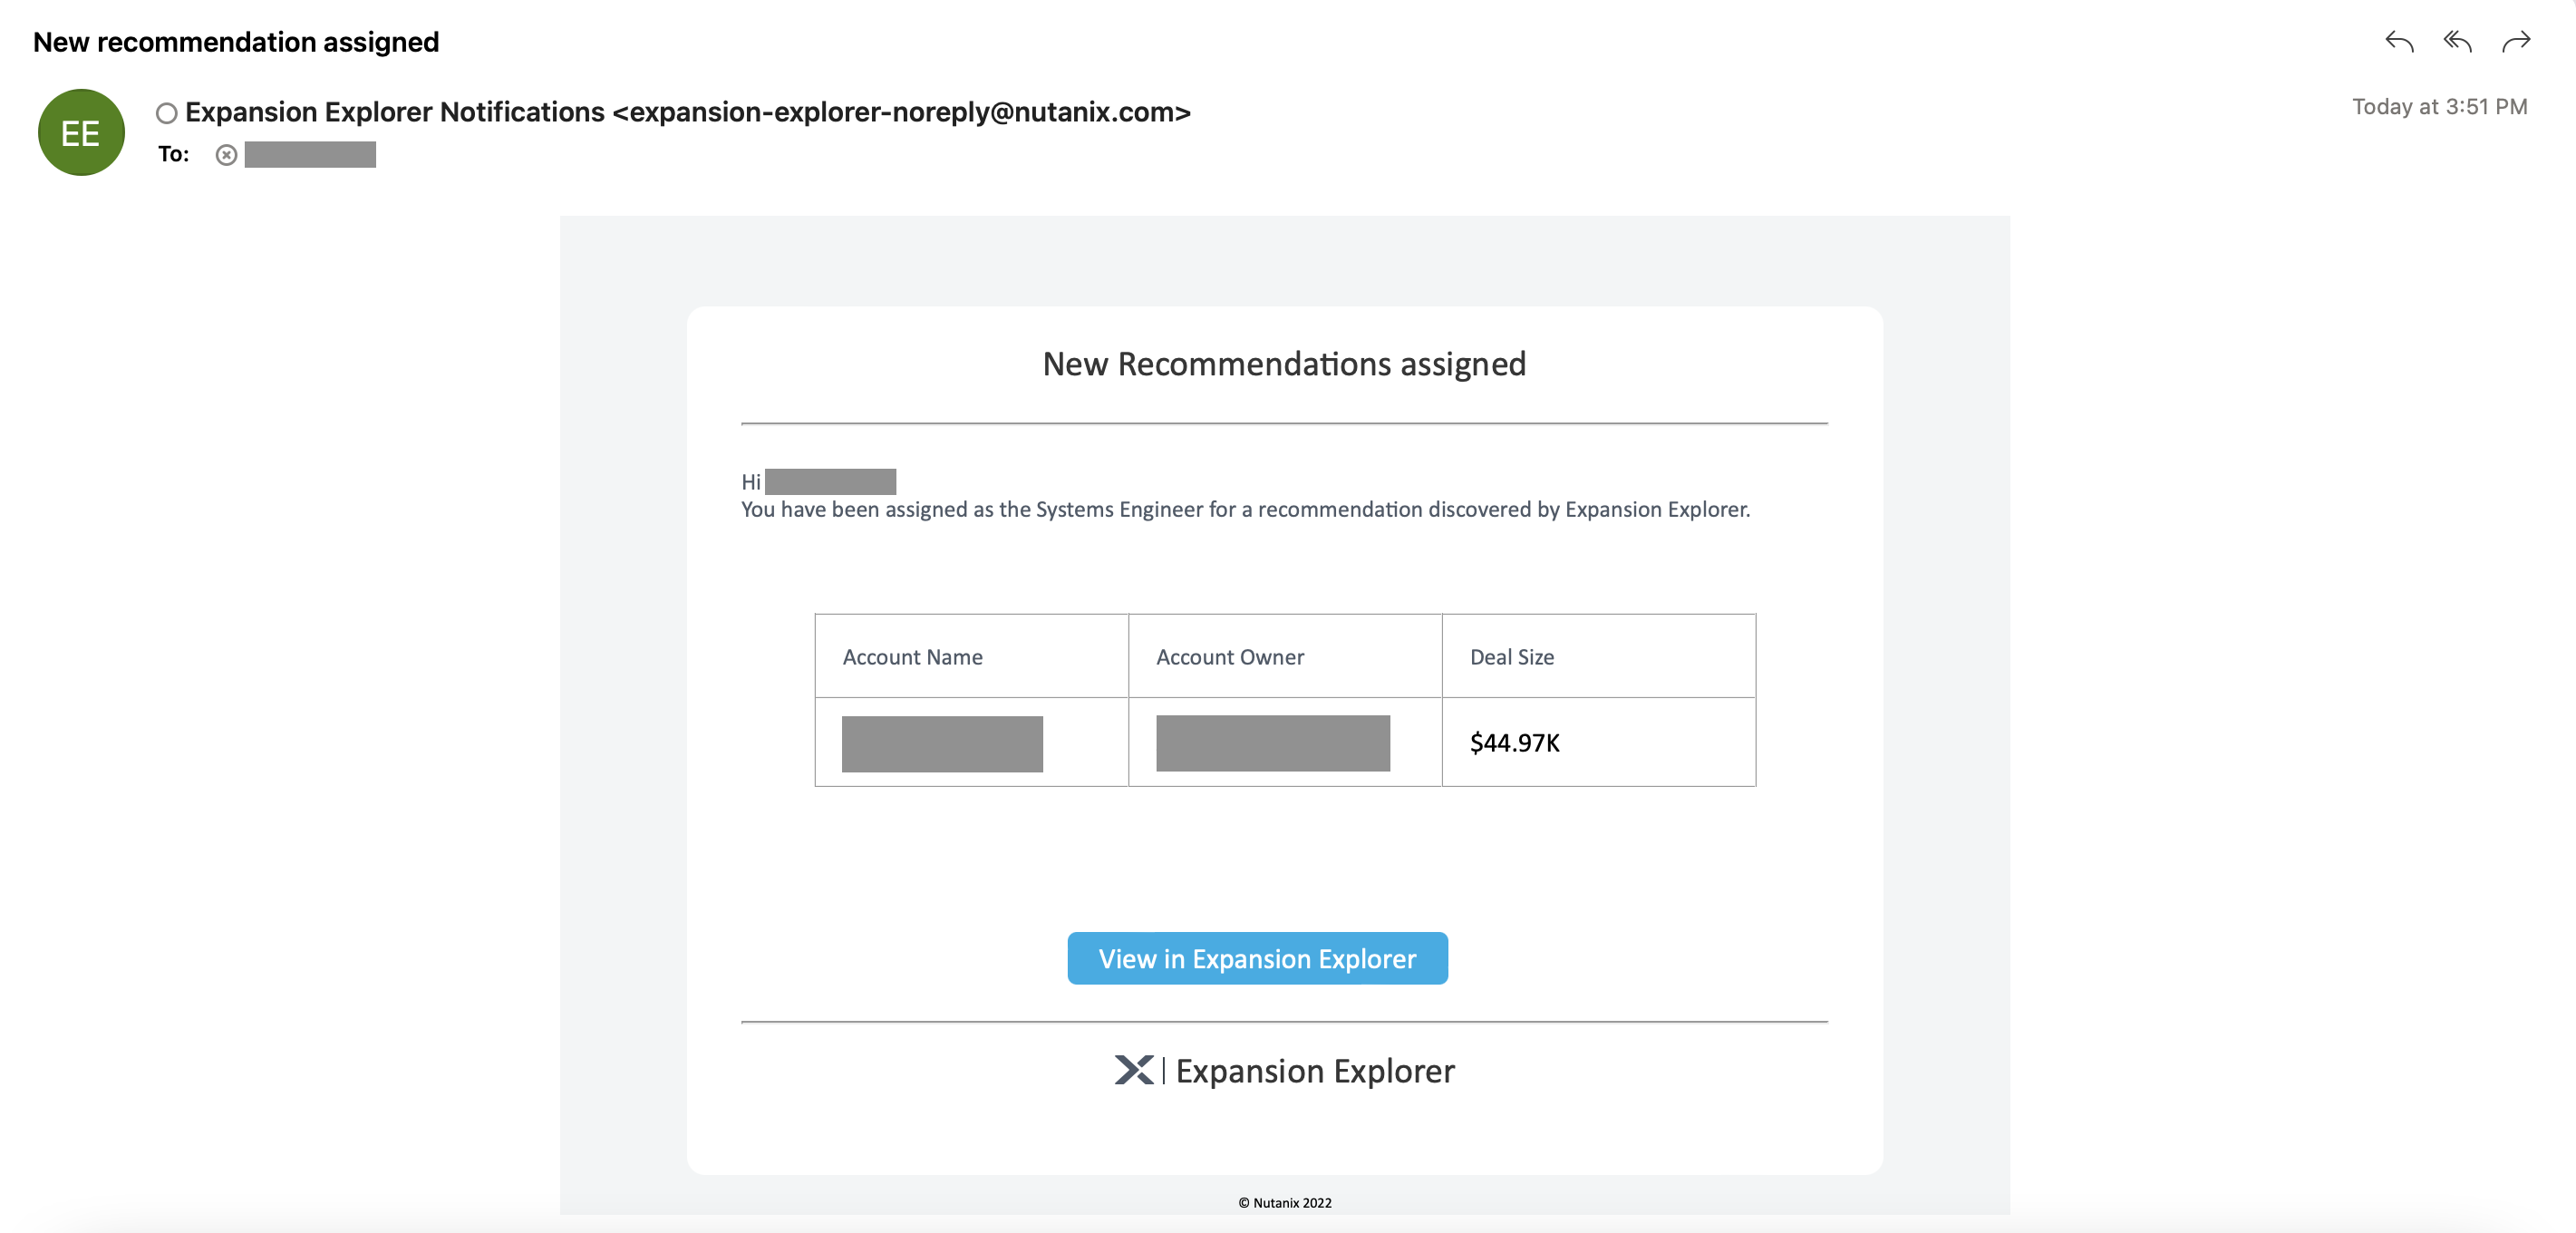
The recipient can then click on “View in Expansion Explorer” or login into Expansion Explorer to view the assigned leads. 

Accepting Leads & pursuing via Partner

The Account Owner can accept a lead by clicking “Accept”. The Account Owner can then go ahead and assign the lead to either Nutanix Systems Engineer and hand it over to a Partner to take it forward. The below screenshot demonstrates assigning the lead to a Partner.
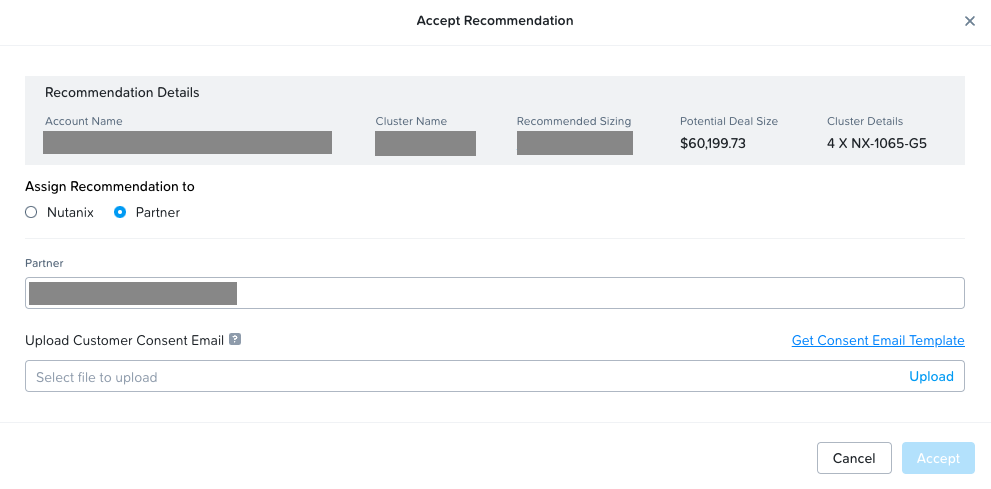
The Account Owner just has to choose the partner from the select list of Partners. Expansion Explorer uses customer Insights data to generate leads, which is considered confidential information of the customer. Sharing customer confidential information with our partners requires consent from the customer. The Account Owner must upload email documentation of customer consent in order to proceed. We have provided a sample email template to get consent from the customer. 

Once the customer consent email is uploaded, the Partner SE & associated Channel SE from the Nutanix side is automatically populated as seen in the screenshot below.
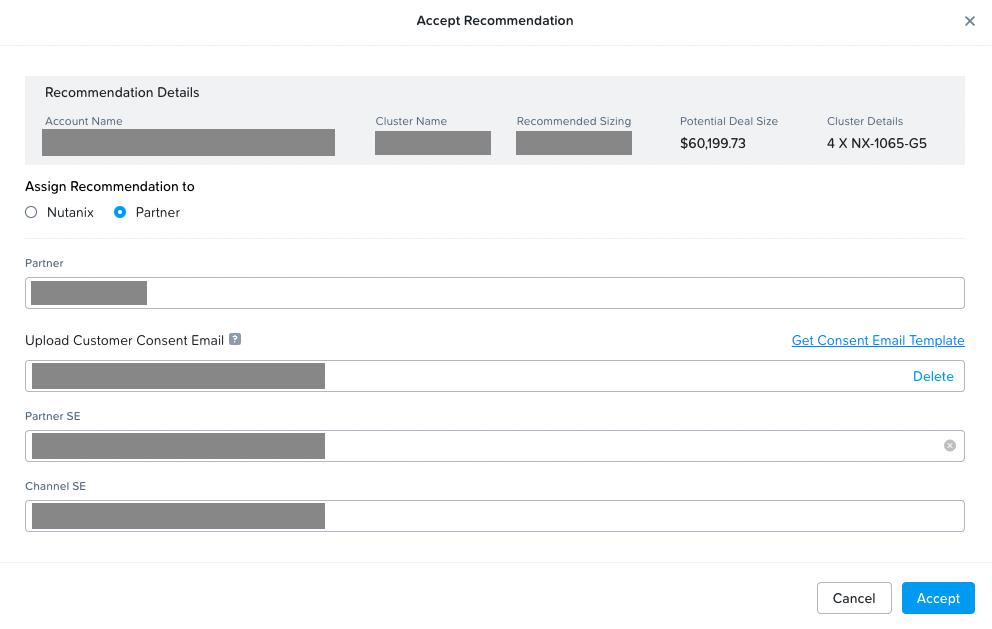
The Account Owner can update the Partner SE or Channel SE if needed before proceeding to accept the lead. Upon accepting, both the Partner SE & Channel SE are notified via email. The lead will show up in their dashboard as well. 

Discarding Lead

In case the Account Owner finds the lead irrelevant, there is an option to discard the lead by clicking on the “Discard” action. The following dialog shall appear and ask for the reason for discarding, the reason provided shall be used to improve the product in the future. 
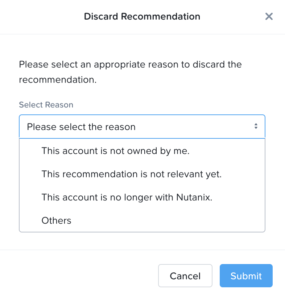
The user can select one of the predefined reasons or select “Others” and optionally provide additional information before submitting. 

Accepted Leads

At any time, if the Account Owner wants to view the accepted leads, they can switch to the “Accepted” tab. The “Accepted” tab displays all the information that could be seen in the “Open” tab along with the assignee of the lead. Below is a sample screenshot displaying the “Accepted” tab:
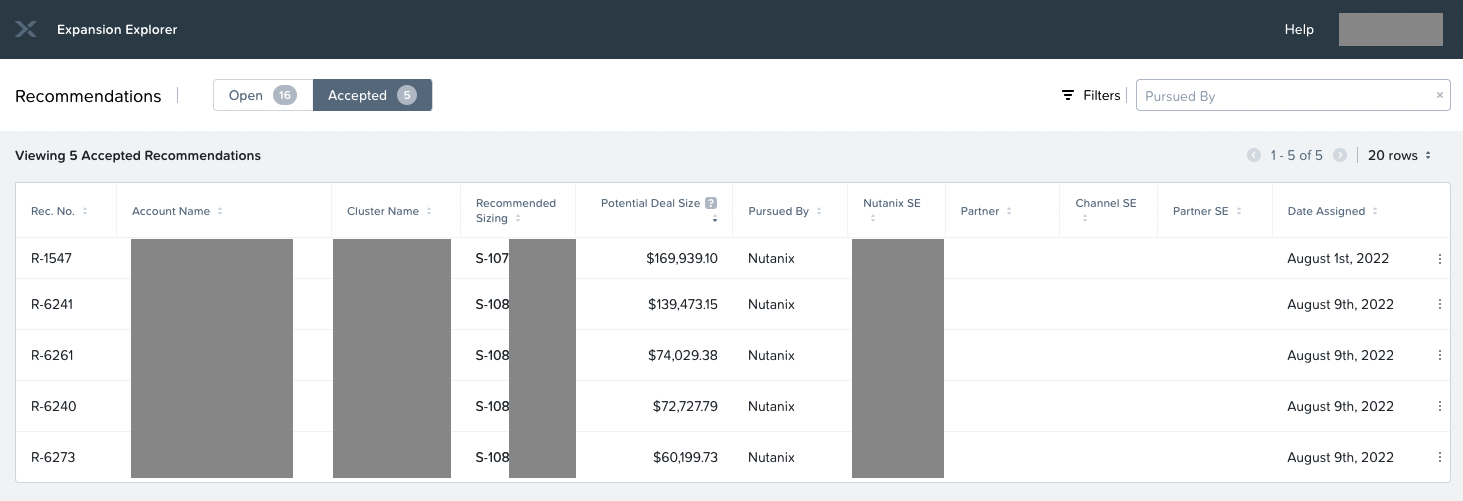
Reassign Lead

The Account Owner can reassign an existing lead if required by clicking on the  ellipsis points and selecting “Reassign”. The below dialog shall appear allowing the user to reassign the lead. 
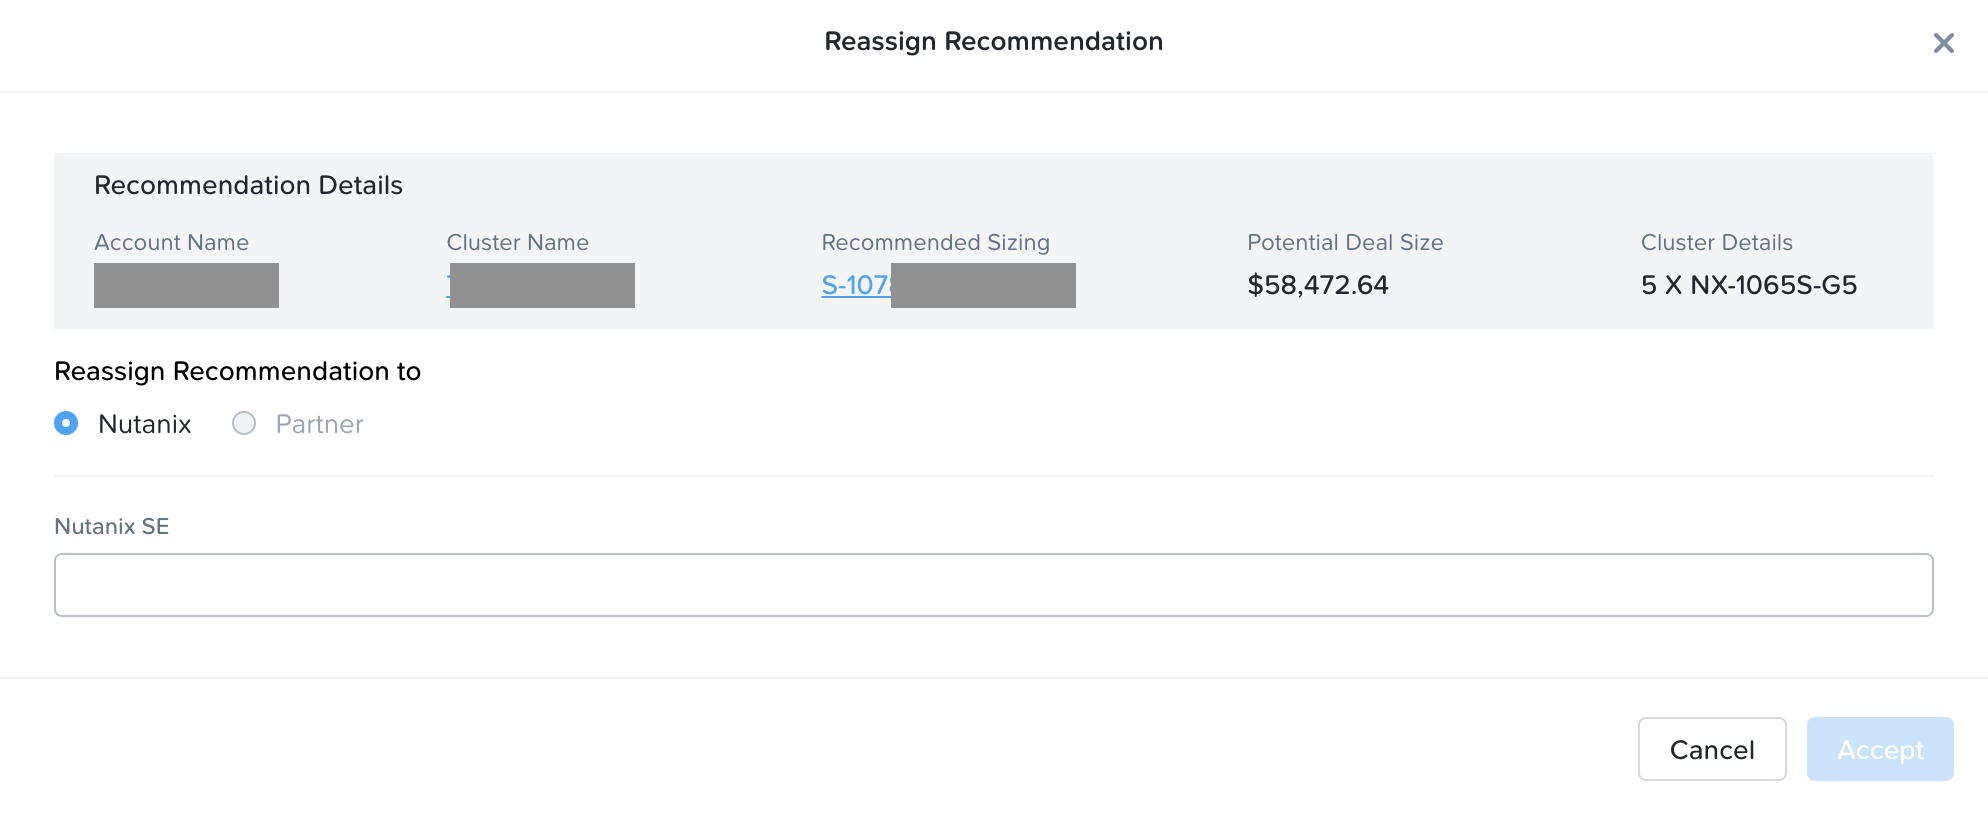
The Account Owner can update the new assignee and the lead is reassigned along with an email notification to the new assignee. 

Optionally, the Account Owner can also decide to discard the lead that is already assigned to the SE. Discarding an assigned lead too can be achieved via ellipsis points and selecting “Discard”. The user will be prompted to provide a reason for discarding the lead. 

Nutanix Systems Engineer Dashboard

The Nutanix Systems Engineer would find leads populated in the Expansion Explorer dashboard when the Account Owner assigns the lead. Similar to the Account Owner, the Nutanix System Engineer can view the below information for each lead:

Column Name Description
Lead ID Unique lead ID for the cluster that needs to undergo a full hardware refresh
Account Name Name of the Account that owns this cluster, the hyperlink redirects the user to the SDFC Account post-authentication. 
Account Owner The Account Owner who is associated with the lead ID. 
Cluster Name Name of the cluster for which the lead is generated, the hyperlink redirects the user to the cluster within Nutanix Insights post-authentication. 
Cluster Details Provides the node quantities and the hardware model that is part of this cluster.
Recommended Sizing A link to autogenerated Sizer solution based on the cluster workload information gathered via Nutanix Insights. The hyperlink redirects the user to the scenario in Sizer post-authentication.
Create Date The date on which this lead was generated by Expansion Explorer.
Potential Deal Size The total list price of the recommended solution including both the hardware and software is recommended by Sizer.
Assigned Date The date on which this lead was assigned to the user. 

Below is a sample screenshot of Nutanix Systems Engineer’s Dashboard
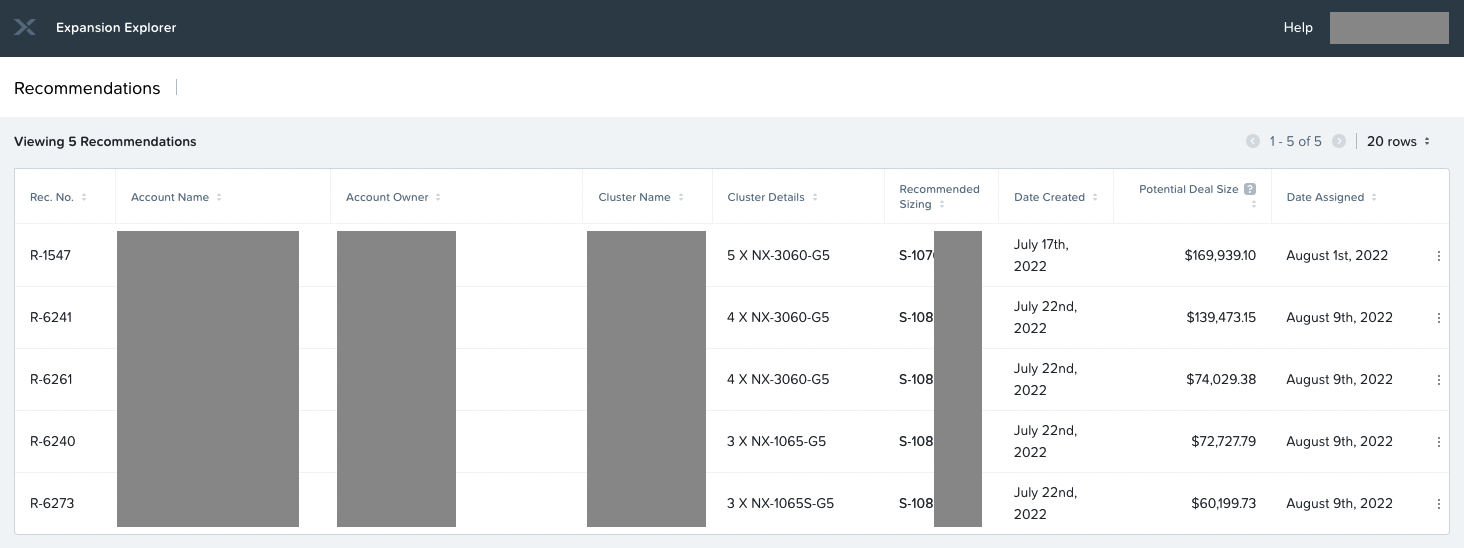
Nutanix Systems Engineer can then refer to the recommended sizing and analyze the workload information and validate if the information is accurate – Refer to “Details about Recommended Sizing”. It is also recommended that the Systems Engineer checks with the customer on any plans to expand or decommission existing workloads. Based on the analysis and discussion with the customer, the SE can tweak the sizing to arrive at a solution that meets the customer’s requirements. 

Reassign Lead

In case, the SE is held with other work, the SE can decide to reassign the lead to a peer SE via ellipsis points and selecting “Reassign”. The below dialog shall allow the SE to reassign the lead. 
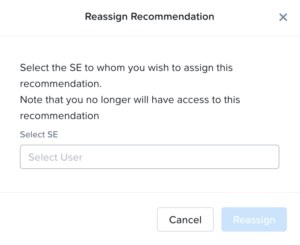
Upon reassignment, the lead will be moved out of the SE’s dashboard and appear in the new assignee’s dashboard. Email notification shall also be sent out to the new assignee about the lead assignment.